Amazon. com Help About AmazonLocal & Amazon Delivers E-mail Subscriptions
Setting up Your Account in Europe
Amazon has established marketplaces in five European countries that can reach up to 27 countries through Europe. An EU selling account enables you to sell in multiple marketplaces from a single account, simplifying listing, pricing, fulfillment, and getting paid.
Amazon Europe Marketplace Account
When you sign up to sell with an Amazon Europe Marketplace Account, your seller account is automatically enabled to allow you to sell on all Amazon EU marketplaces:
You will be asked to define your source marketplace, which can be any of the five marketplaces.
You can choose an Individual or Professional selling plan depending on how much you expect to sell in a given month. If you register for a Professional selling account, you will be charged a monthly subscription fee based on your source marketplace. When you sell on any of the Amazon marketplaces in Europe, country-specific, per-item fees are charged to your unified account.
Inventory and orders
With a unified account, your inventory can be managed as a single pool available to all the marketplaces on which you choose to offer your products for sale. All your orders will be managed in a single account, making trading in Italy feel just like trading in the UK. When you include Fulfillment by Amazon, we will deliver orders to other Amazon EU Marketplaces from your source inventory pool using Amazon's fast and reliable European Fulfillment Network.
Qualifications
To be able to sell on Amazon in each EU marketplace, you will need to satisfy the Amazon seller rules applicable to each country. These are basic rules to ensure Amazon's customers enjoy the best possible shopping experience, thereby improving the chances that they'll buy your products.
You need to provide a bank account in one of the countries supported by Amazon. Currently Amazon supports bank accounts in the following countries:
- Austria Belgium Cyprus Estonia Finland France Germany Greece Ireland Italy Luxembourg The Netherlands Portugal Slovakia Slovenia Spain The United Kingdom The United States
You should be aware of the local and EU legal and regulatory requirements; it is your responsibility to comply with those that apply.
About Deliveries from Amazon
Amazon Logistics is Amazon's delivery service. Orders shipped by Amazon Logistics will show as 'Delivery by Amazon'.
On-Road Incident Emergency Hotline
Safety is Amazon's top priority. While most deliveries make it to customers without issue, we are ready to support you in the event of an emergency involving Amazon Logistics and Amazon Flex delivery drivers. If you witness or experience a serious on-road incident involving a delivery driver, please
Secure your own safety. Call 999 if police or emergency medical services are needed. Report the incident to Amazon by calling +44 808 164 6718 to receive 24/7 immediate assistance.
Amazon provides a technology and logistics platform that empowers local and regional delivery companies across the UK to deliver Amazon parcels to customers seven days a week. This platform compliments our current large, national delivery partners and provides additional capacity as more and more customers enjoy Amazon Prime's next day delivery benefits.
Tracking Your Order
You can track your parcel at any time through Your Orders.
Find the order you want to track and click Track Package.
Estimated Delivery Windows
You can learn more about Estimated Delivery Windows here.
Delivery Information
If no one is at the address when delivery is attempted, Amazon will post the parcel through your letter box if possible, leave it in your preferred safe place or a secure location, or deliver to a neighbour. A signature will be required on delivery for all parcels valued at £100 or more.
Note: During checkout, on the Review your order screen, you'll see the heading What if I am not in under your delivery address. Click Tell us where to leave your package to nominate a preferred neighbour or to select a safe place for delivery. If you'd like your delivery preference to be applied to all future orders to this address, check the "Use these preferences for all future deliveries to this address" box. Please note that some orders won't be eligible for unattended delivery.
Note: Certain items available on Amazon. co. uk are age restricted. By placing an order for one of these items you are declaring that you are 18 years of age or over. Val >Privacy Notice.
If Amazon can't deliver your parcel on the first attempt, delivery will automatically be re-attempted for up to four more times. You can select a date for redelivery by clicking on the Track Package button bes >Your Orders. If your order is eligible for redelivery, you’ll be able to click the ‘Request reschedule’ link. If Amazon is unable to successfully deliver the parcel, it will then be returned to our Fulfilment Centre and a refund will be processed to your payment card.
Note: Deliveries to commercial addresses will only be made Monday - Friday.
You may find that the tracking will sometimes show that a parcel has been delivered, but you haven't received it. In these instances, we'd recommend that you check to see if the parcel was left in secure location, such as your letter box, shed or garage, or with one of your neighbours. You can visit our Help Page for more information. If you've checked these places, and you still can't locate your parcel, please Contact Us and we'll be happy to look into it for you.
Delivery Instructions and Access Codes
If you'd like to give the driver instructions about a safe place for leaving your parcel, and you haven't entered it during check-out, you can add a delivery instruction through Your Account. Just click Track Item on the relevant order in Your Orders and click "Provide Delivery Instructions" on the Progress Tracking page.
You can also manage your delivery address for future orders through Your Account. Just go to Manage Address Book under "Settings", click Change and provide the address type (Residential or Commercial) or security access code, as necessary. This information will be saved and applied to any future orders you place.
Weekend Delivery Preferences
When adding a new address, you can choose weekend availability preferences under "Optional Delivery Preferences".
You can also update an existing address with weekend availability preferences by visiting Your Account. Just go to Manage Address Book under "Settings", click Change and then choose the most appropriate options for your address.
Addresses with no weekend availability preference set receive deliveries 7 days a week. Addresses with Saturday and Sunday deselected in Weekend Availability preferences will receive deliveries on weekdays only, excluding holidays.
E-mail Notifications
You’ll receive an e-mail when we dispatch your parcel and another one when it goes out for delivery with the Amazon.
You’ll also receive an e-mail if your parcel is left in a secure location, delivered to a neighbour, if a delivery attempt is unsuccessful, or if the driver has difficulties locating the address.
If you sign up for Text Trace or Mobile App notifications, you’ll also receive updates on your phone or other mobile device.
Customer Service
Amazon Customer Service handles all enquiries for Amazon deliveries.
You can Contact Us if you need to reschedule a delivery, request a redirection, or with any other queries you may have.
Was this information helpful?
Thank you for your feedback.
Please select what best describes the information:
Thanks! While we're unable to respond directly to your feedback, we'll use this information to improve our online Help.
Deliver the Mail with Amazon SES and Rails

Amazon Simple Email Service (Amazon SES) is a cost-effective email service built on the reliable and scalable infrastructure that Amazon. com developed to serve its own customer base. With Amazon SES, you can send transactional email, marketing messages, or any other type of high-quality content to your customers. You can also use Amazon SES to receive messages and deliver them to an Amazon S3 bucket, call your custom code via an AWS Lambda function, or publish notifications to Amazon SNS. With Amazon SES, you have no required minimum commitments – you pay as you go and only pay for what you use.
This post will walk you through quickly setting up a Rails app to send 62,000 free emails per month if you are sending from an Amazon EC2 instance (App deployed on Amazon EC2). Additionally, you can also receive 1,000 emails per month for free on Amazon SES. Even if you’re not on Amazon EC2 you can still get the cheapest ($0.10 per 1,000 emails) pricing available when hosted elsewhere (Heroku, DigitalOcean etc.). We’ll be sending emails from the Amazon SES Sandbox for this article, as moving out of the Sandbox requires requesting AWS support for extended access. Sending emails from the Sandbox has some limitations, like we have to verify both the sending and receiving email addresses. But we can test our setup by doing so and ensure that everything is setup properly with the right code is in place to send emails with extended access in Production.
Why Amazon SES?
It’s the cheapest. Although there are some limitations, like you can’t use dedicated IP addresses and the analytics are not as good as some of the other alternatives out there. But this is great option if you need to send a lot of email within a budget.
Price Comparison
Here is a quick comparison of SES pricing to some of the other well-known email providers.
Cost at 40,000 emails per month:
| AmazonSES | $4 |
| Mailgun | $15 |
| MailJet | $17 |
| Postmark | $30 |
| SendinBlue | $7.5 |
| SendGrid | $10 |
Getting Started
Let’s jump straight into coding to quickly set things up to send emails with our Rails app through Amazon SES. We’re not going to worry about a lot of the vanilla Rails setup, focusing on the intended feature which is to create a bare bone Rails application to send emails through Amazon SES.
I’m running Ruby 2.3.0 and Rails 4.2.6.
This will create a new Rails app. Change your directory to the newly created app:
Create a welcome controller with index action:
Go to the config/routes. rb file and remove all the commented out examples so that you get a clean routes file to work with. Define a get route, a post route and application root by adding these three lines:
The routes file should look something like this after adding the above three lines:
Add the send_email action to welcome_controller (app/controllers/welcome_controller. rb)
Let’s make a form on our application root for sending the emails. Before adding the form to the view file, add Twitter Bootstrap to have an shiny elegant email form. Add the Bootstrap-sass Gem to your Gemfile:
Run the bundle command to make sure the Gem is installed and picked up by our Rails app. You need to remove all contents from your app/assets/stylesheets/application. css file, rename it to application. scss, and add these two lines:
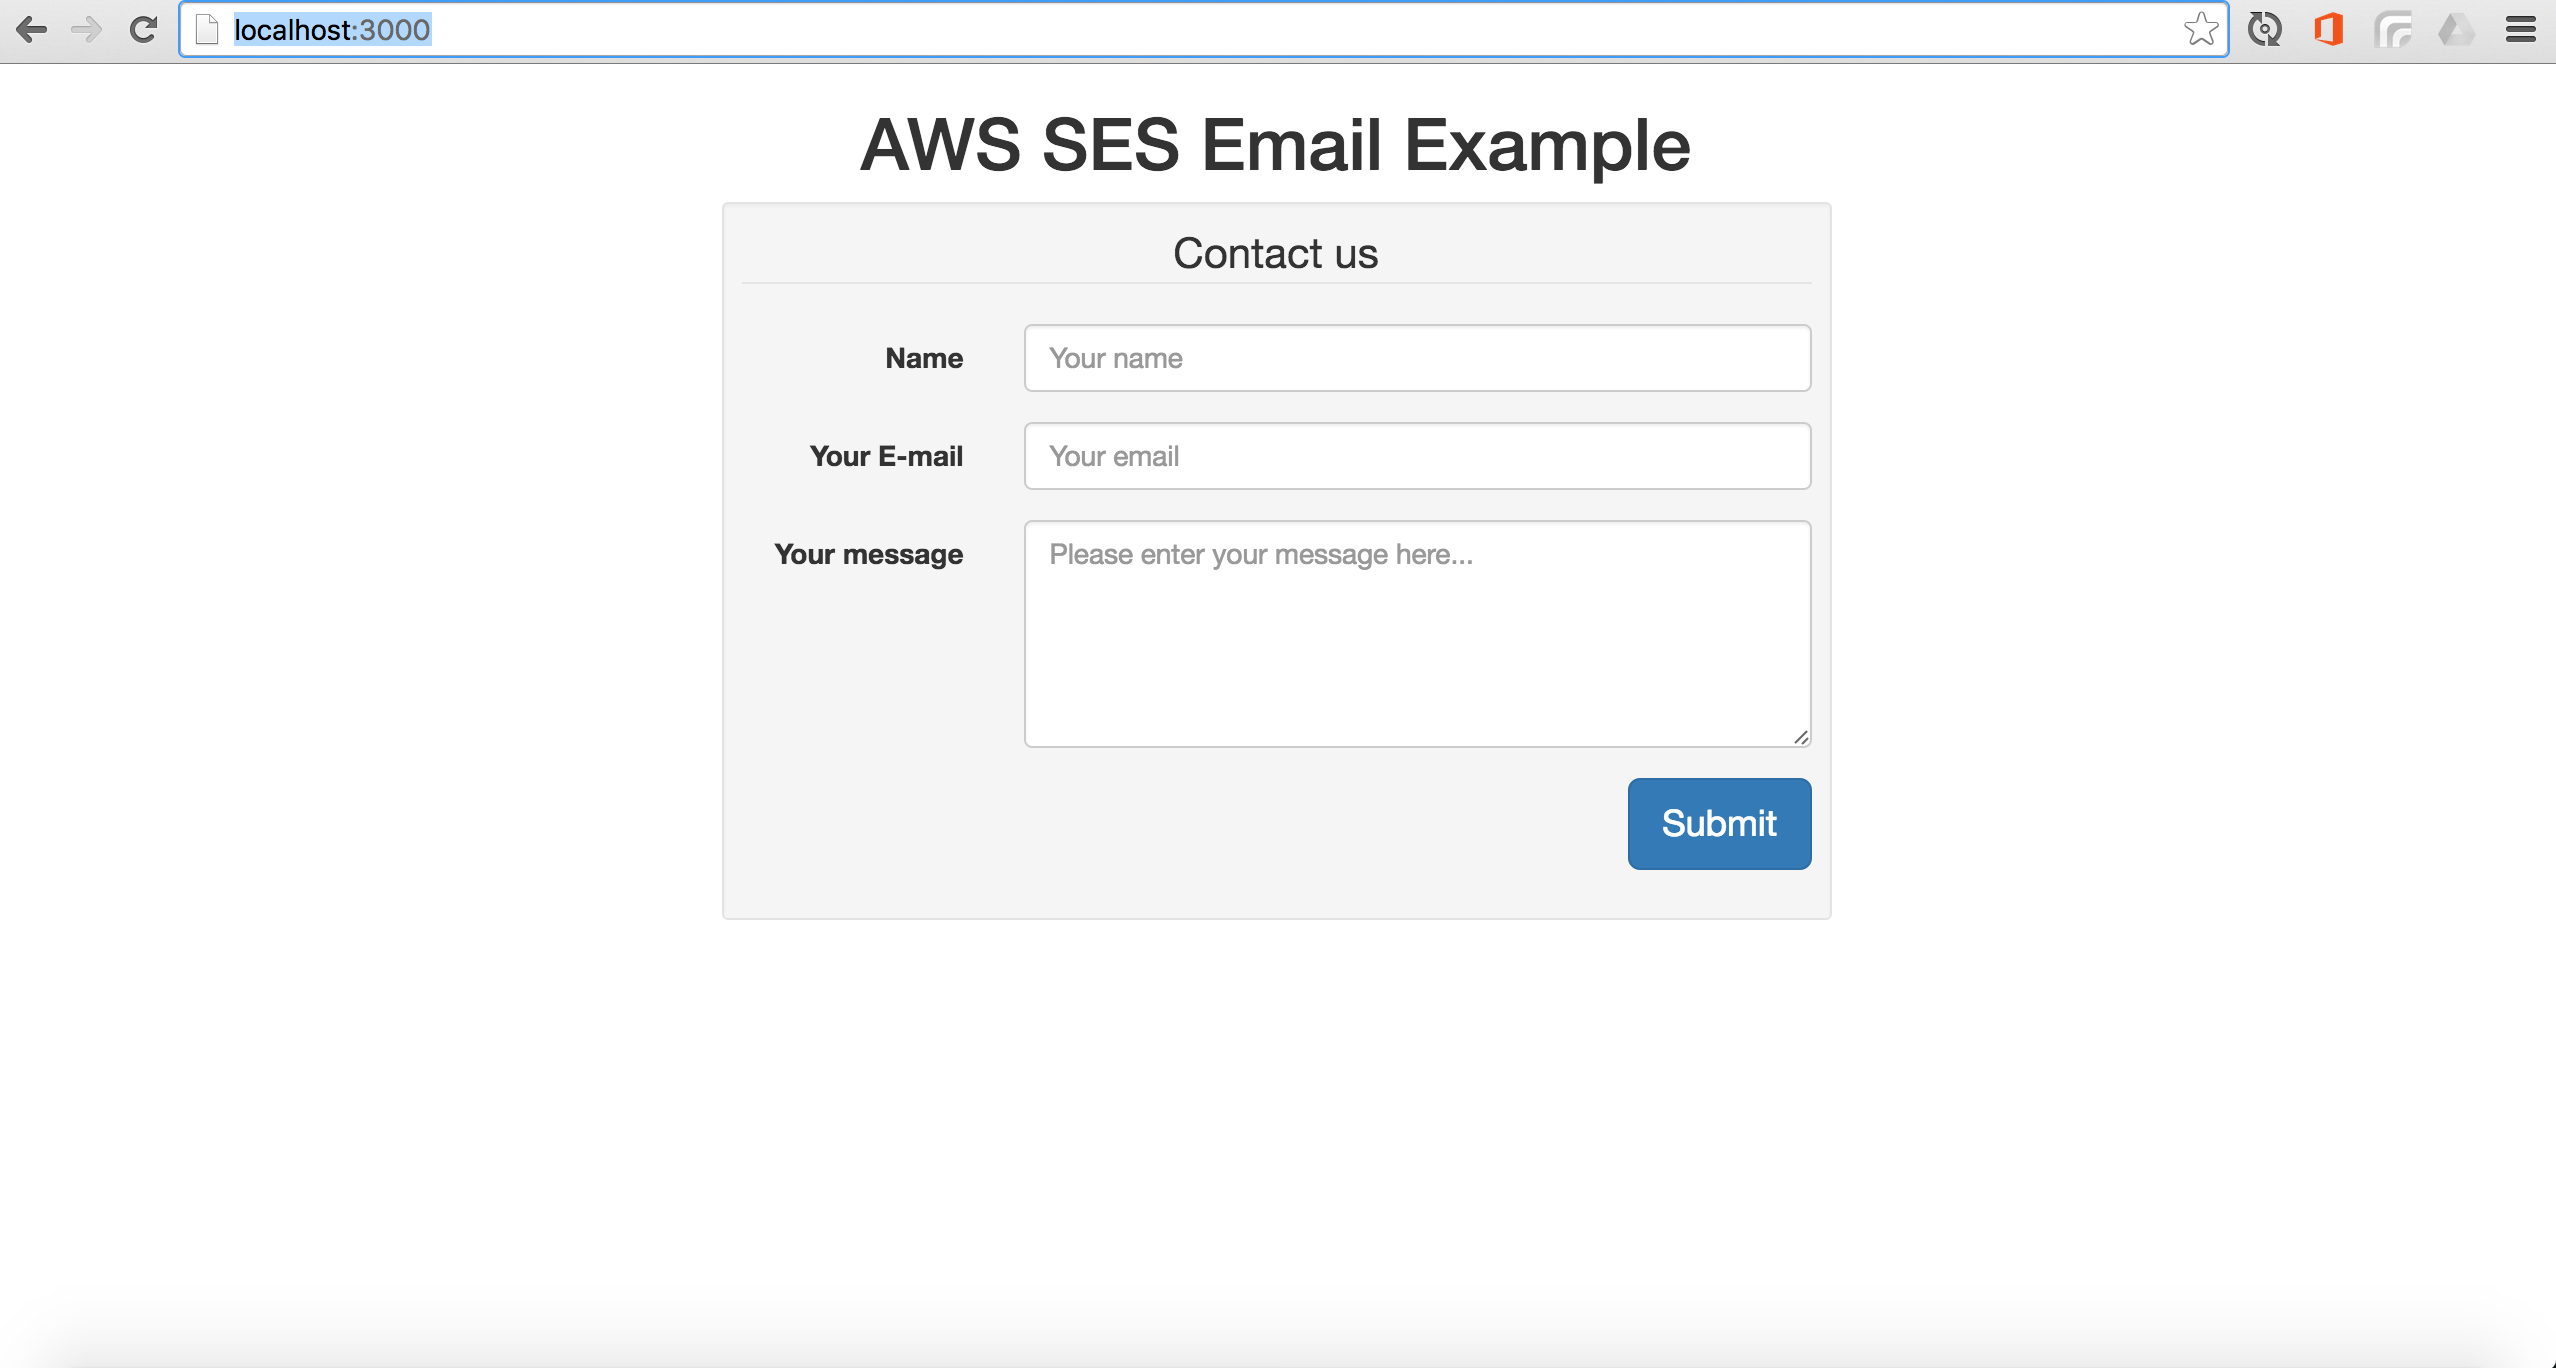
You’re good to go with Twitter Bootstrap, now paste this HTML in app/views/welcome/index. html. erb:
We won’t go into the details of this HTML, as it clearly is out of scope of our intended feature. But this is a super easy HTML form with some Twitter Bootstrap magic which gives us a nice email form.
Go to http://localhost:3000/ in the browser and you should a form like this:
Let’s generate a mailer for our Rails app:
This will add two files application_mailer. rb and my_mailer. rb in app/mailers directory, as well as two files mailer. html. erb and mailer. text. erb in app/views/layouts directory. Now add the send_email action to the empty app/mailers/my_mailer. rb file, which should look something like this:
After adding the send_email action to our mailer file, change the default From email address in app/mailers/application_mailer. rb file to the address you wish to use. In this tutorial, I’ll call it Some_email@example. com.
We can remove app/views/layouts/mailer. html. erb for now, as we will be sending plain Text emails for this tutorial. Create a new file in app/view/mailers/ named send_email. text. erb and add these lines :
This will be used as text template for our emails.
Open up config/environments/development. rb in order to change the SMTP configuration and test the emails out in the local development environment. Deploying this application to a Production environment is out of scope of this post. We’re just going to go through the Amazon SES setup, code and configuration to get our app ready to send 62,000 free email per month from an Amazon EC2 instance. There’s already a great in-depth tutorial on SitePoint which runs through deploying to EC2. In fact, I personally read that tutorial to deploy on Amazon EC2 with Capistrano.
Head over to the config/environments/development. rb and make these changes to get our app ready to send emails. First of all set action_mailer. perform_deliveries to true as it is set to false by default in the Development environment:
Next, look for this line:
And set it’s value to true. This will help debug delivery errors if our email fails to deliver for some reason.
Now paste the SMTP settings info the configuration block:
We have left Address out for later, which we will copy from the Amazon SES management console.
There’s a number of things we need to do now on our Amazon SES management console:
Login to AWS management console. Sign up for AWS if you haven’t already. It’s pretty simple.
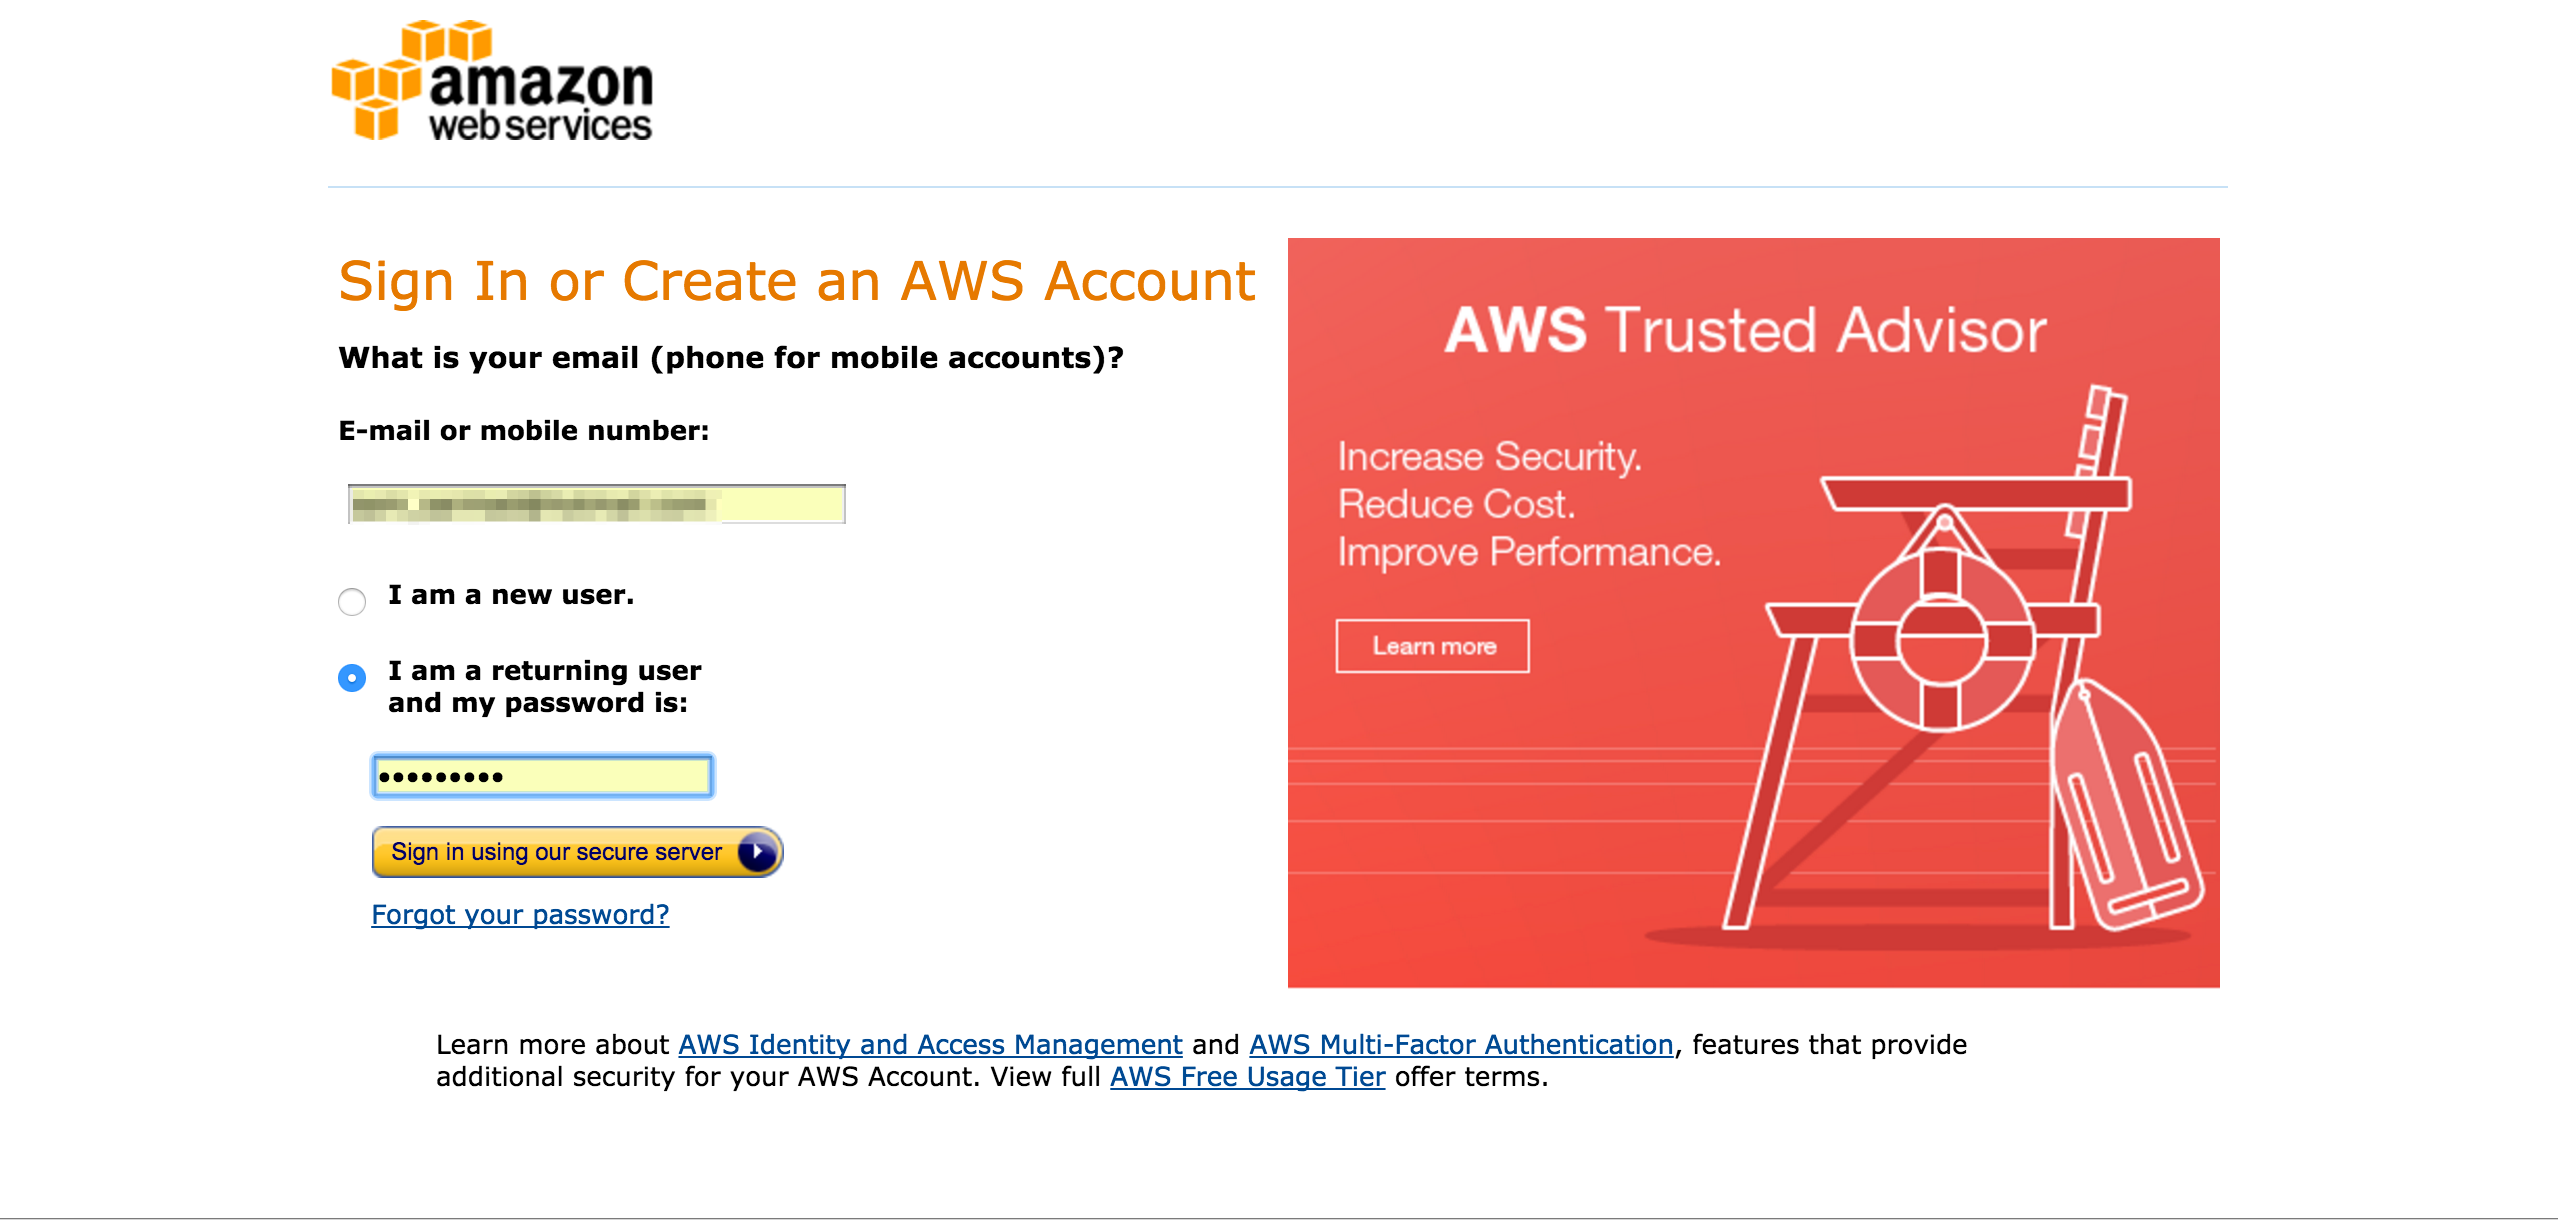
It will take you to the AWS Dashboard, look for SES.
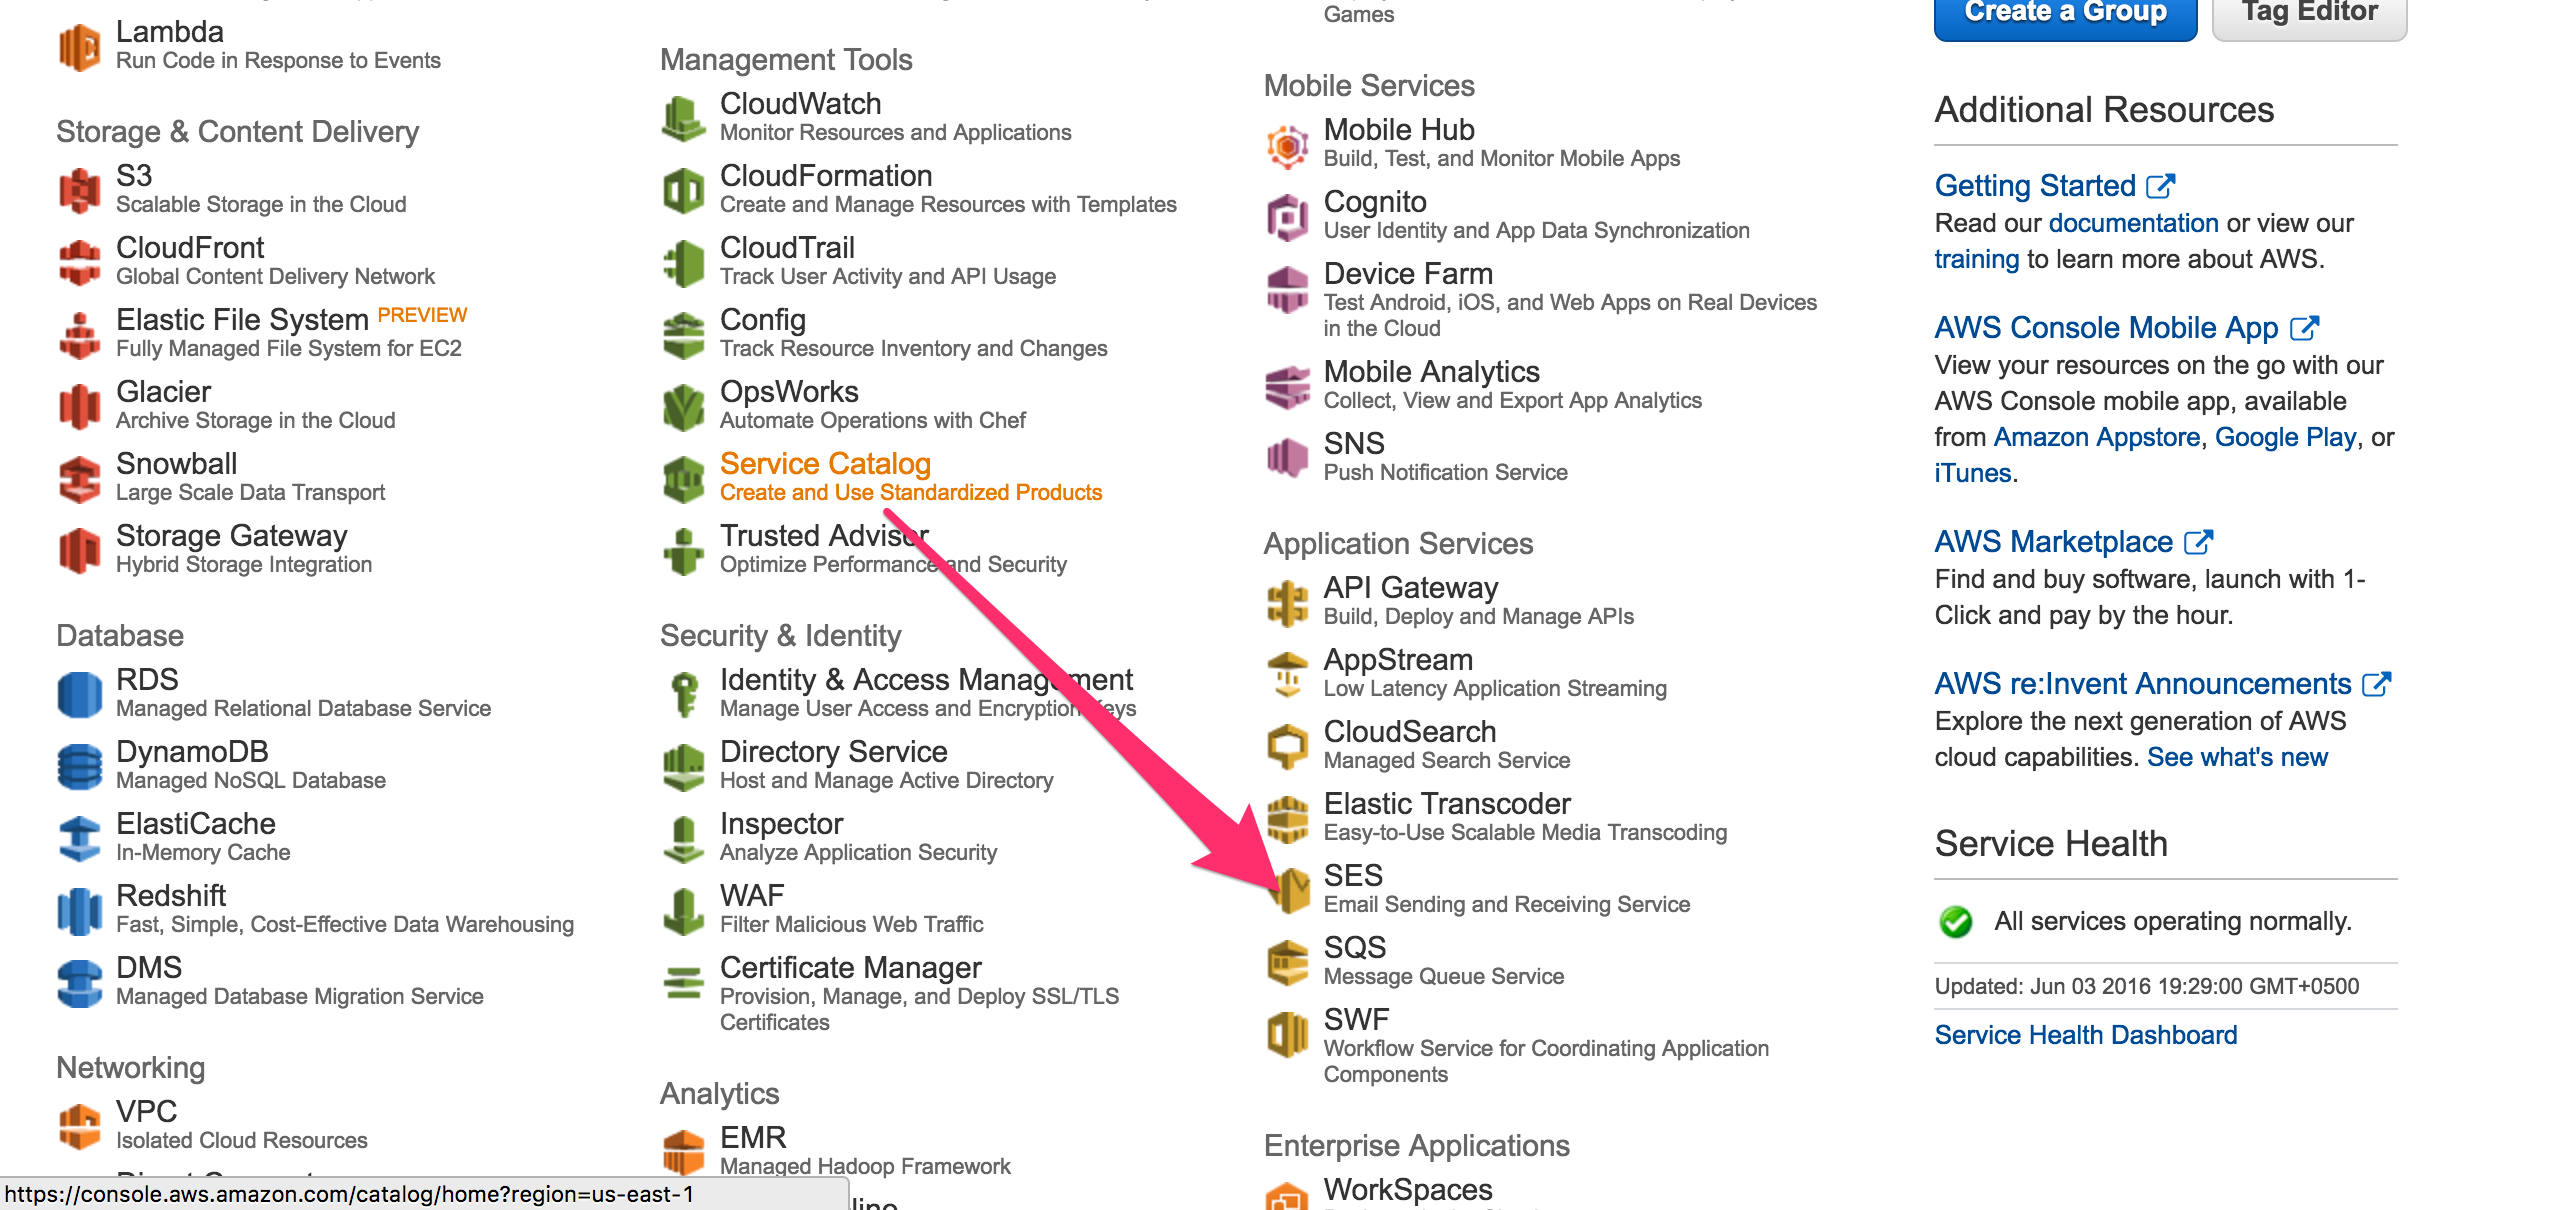
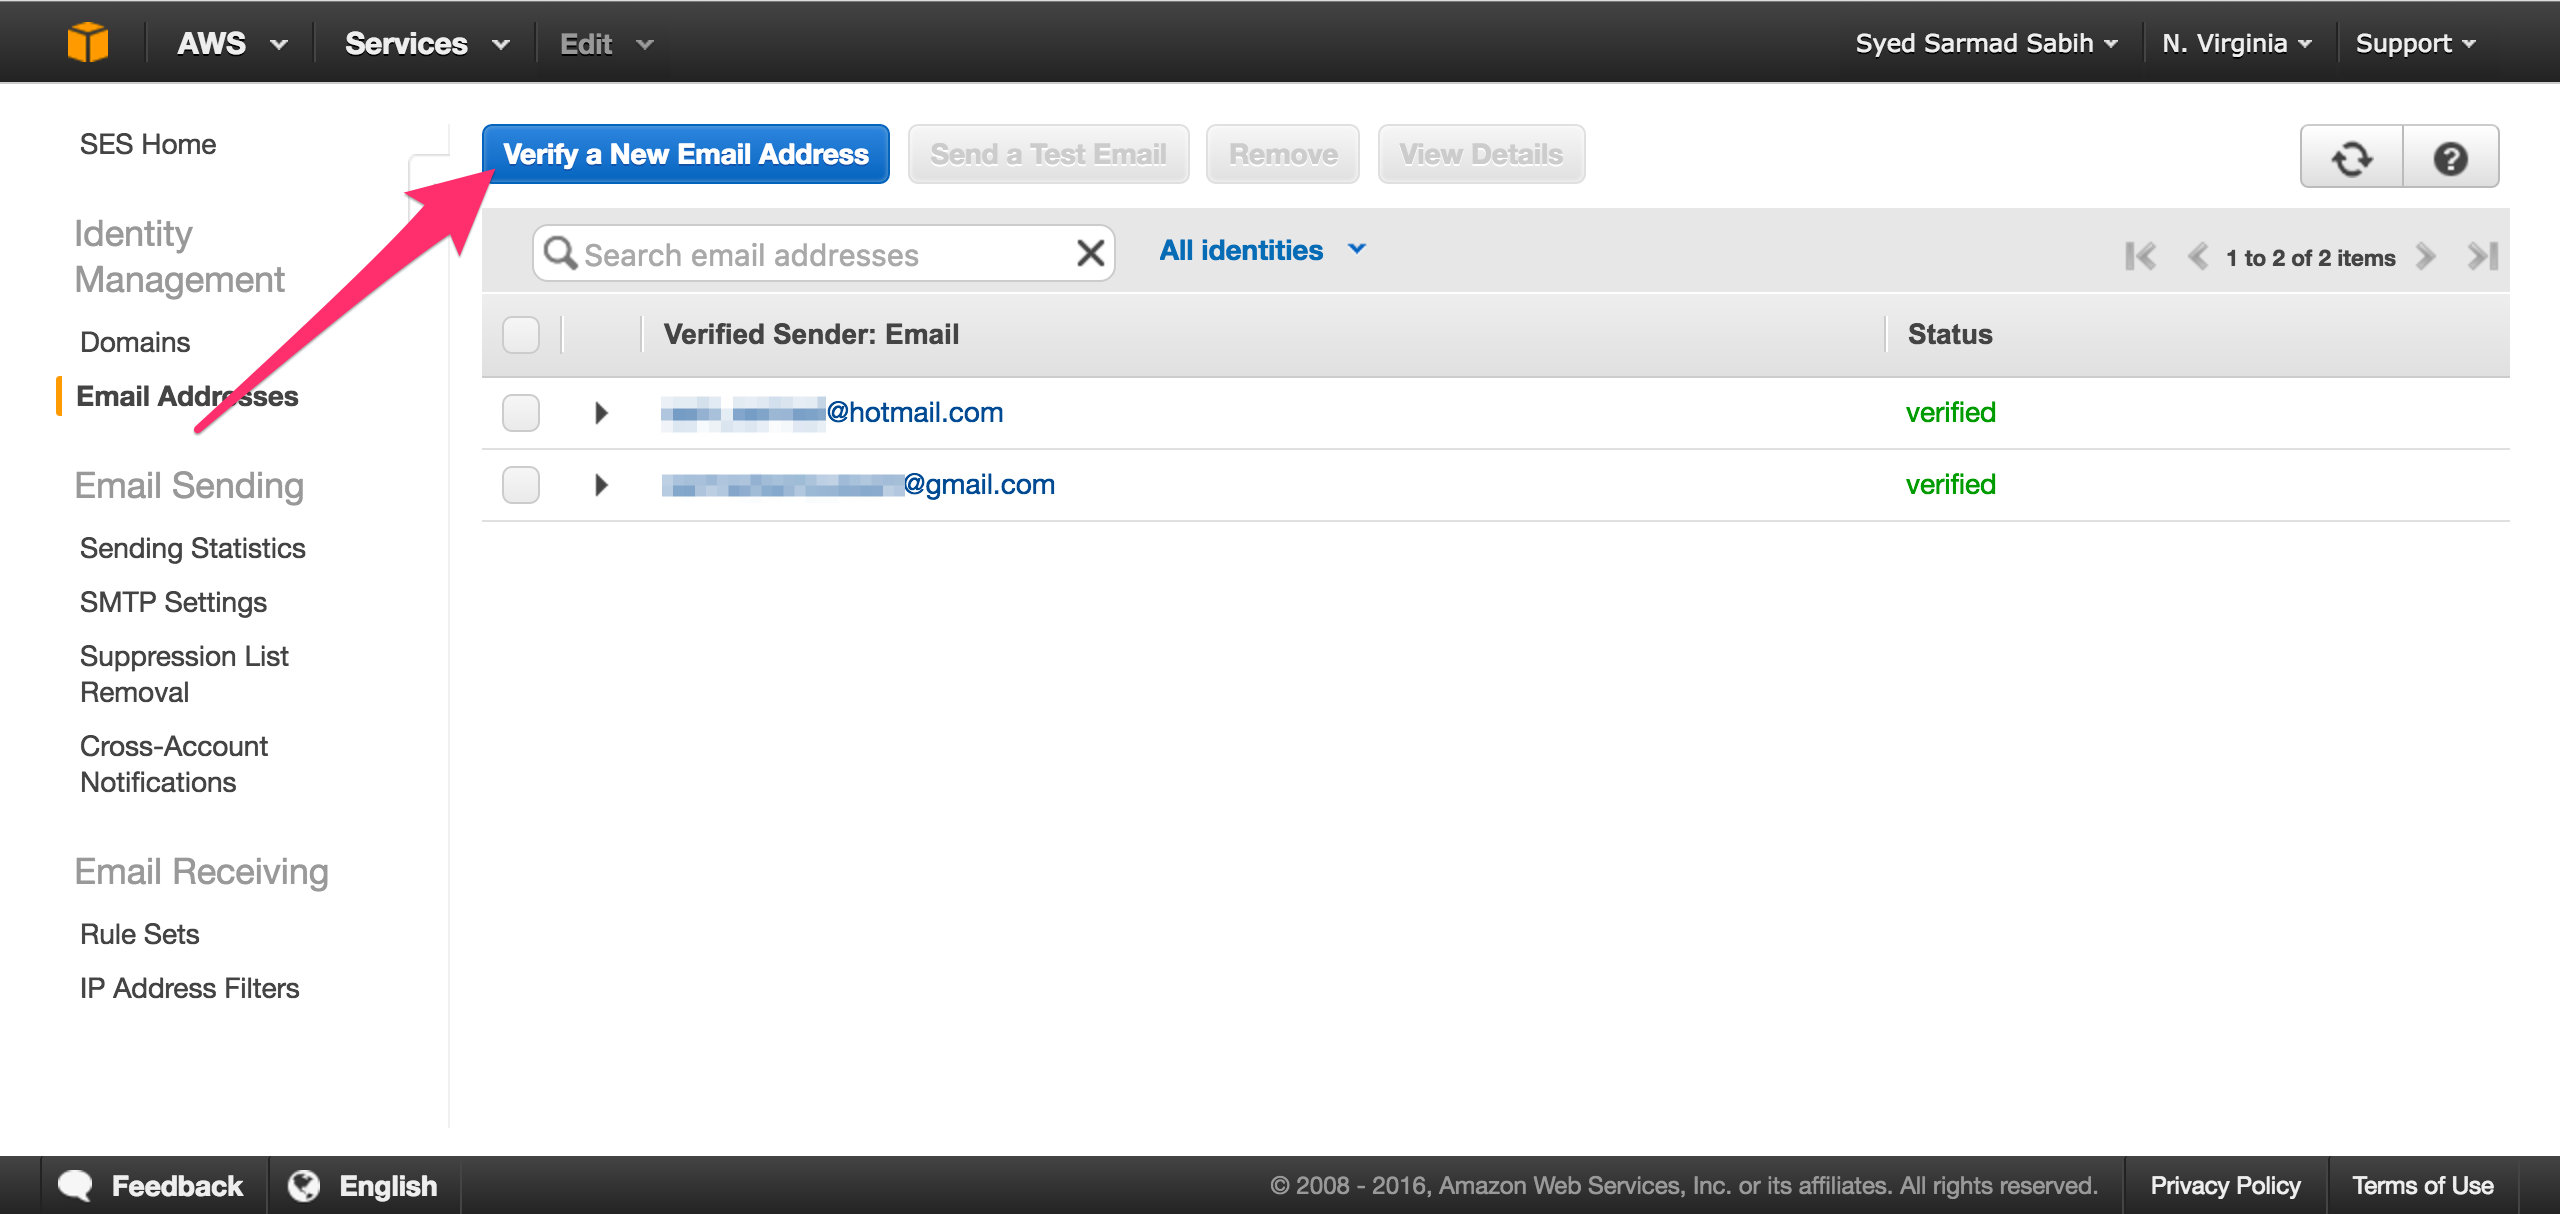
Click on “SES” to go to the Amazon SES Dashboard. Click on “Email Addresses”
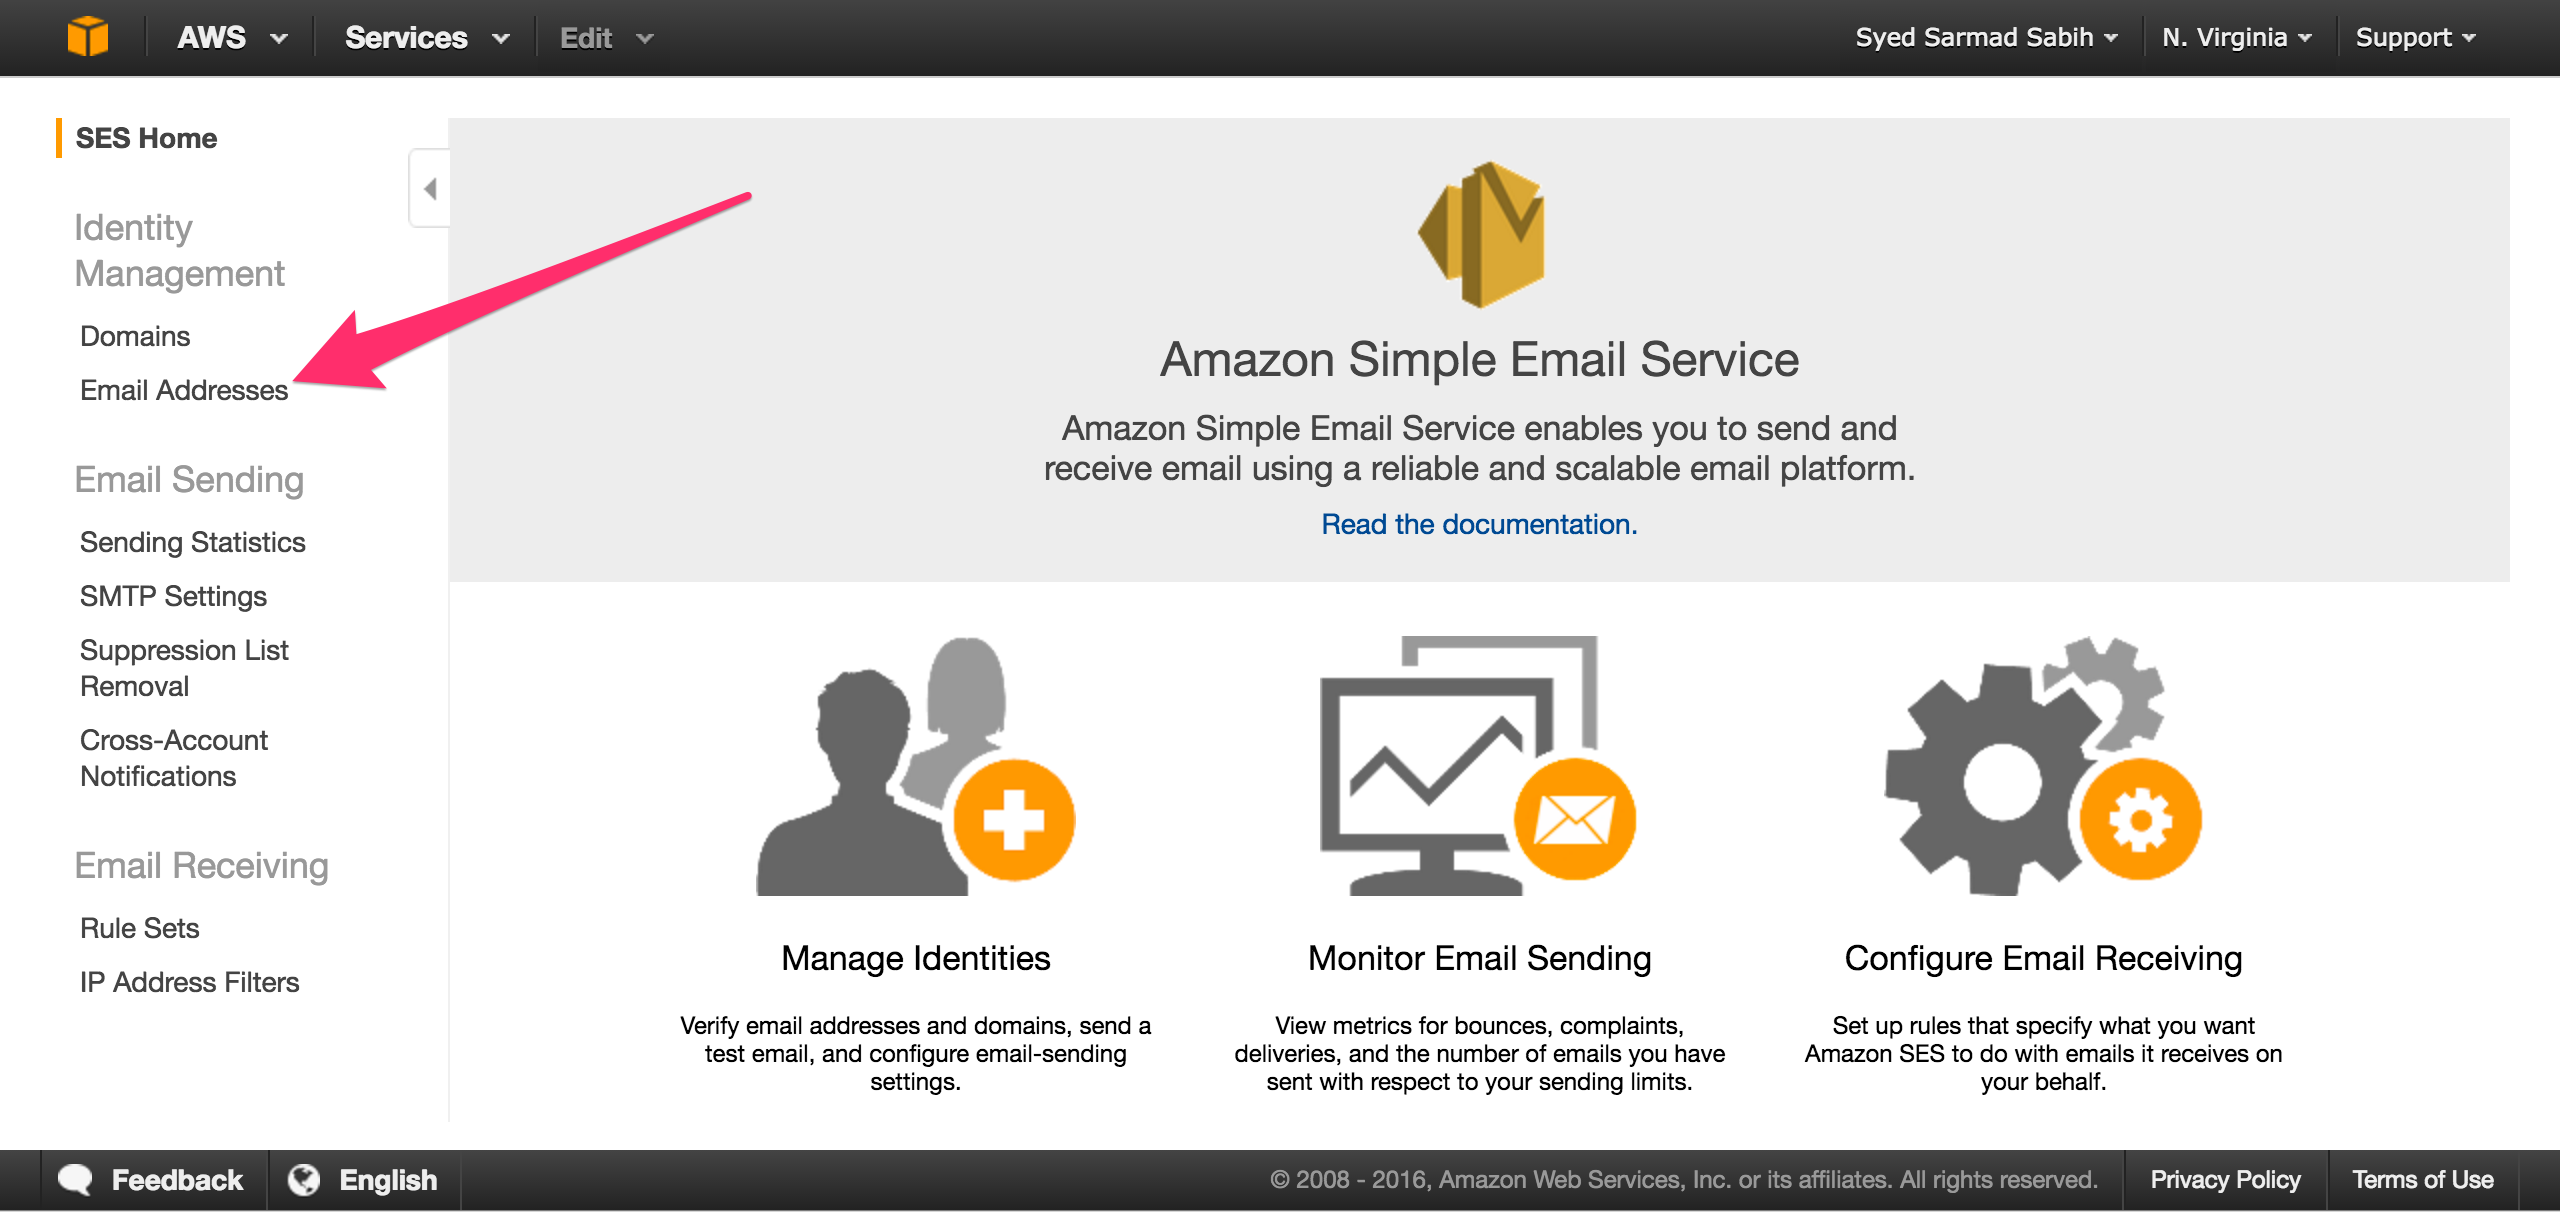
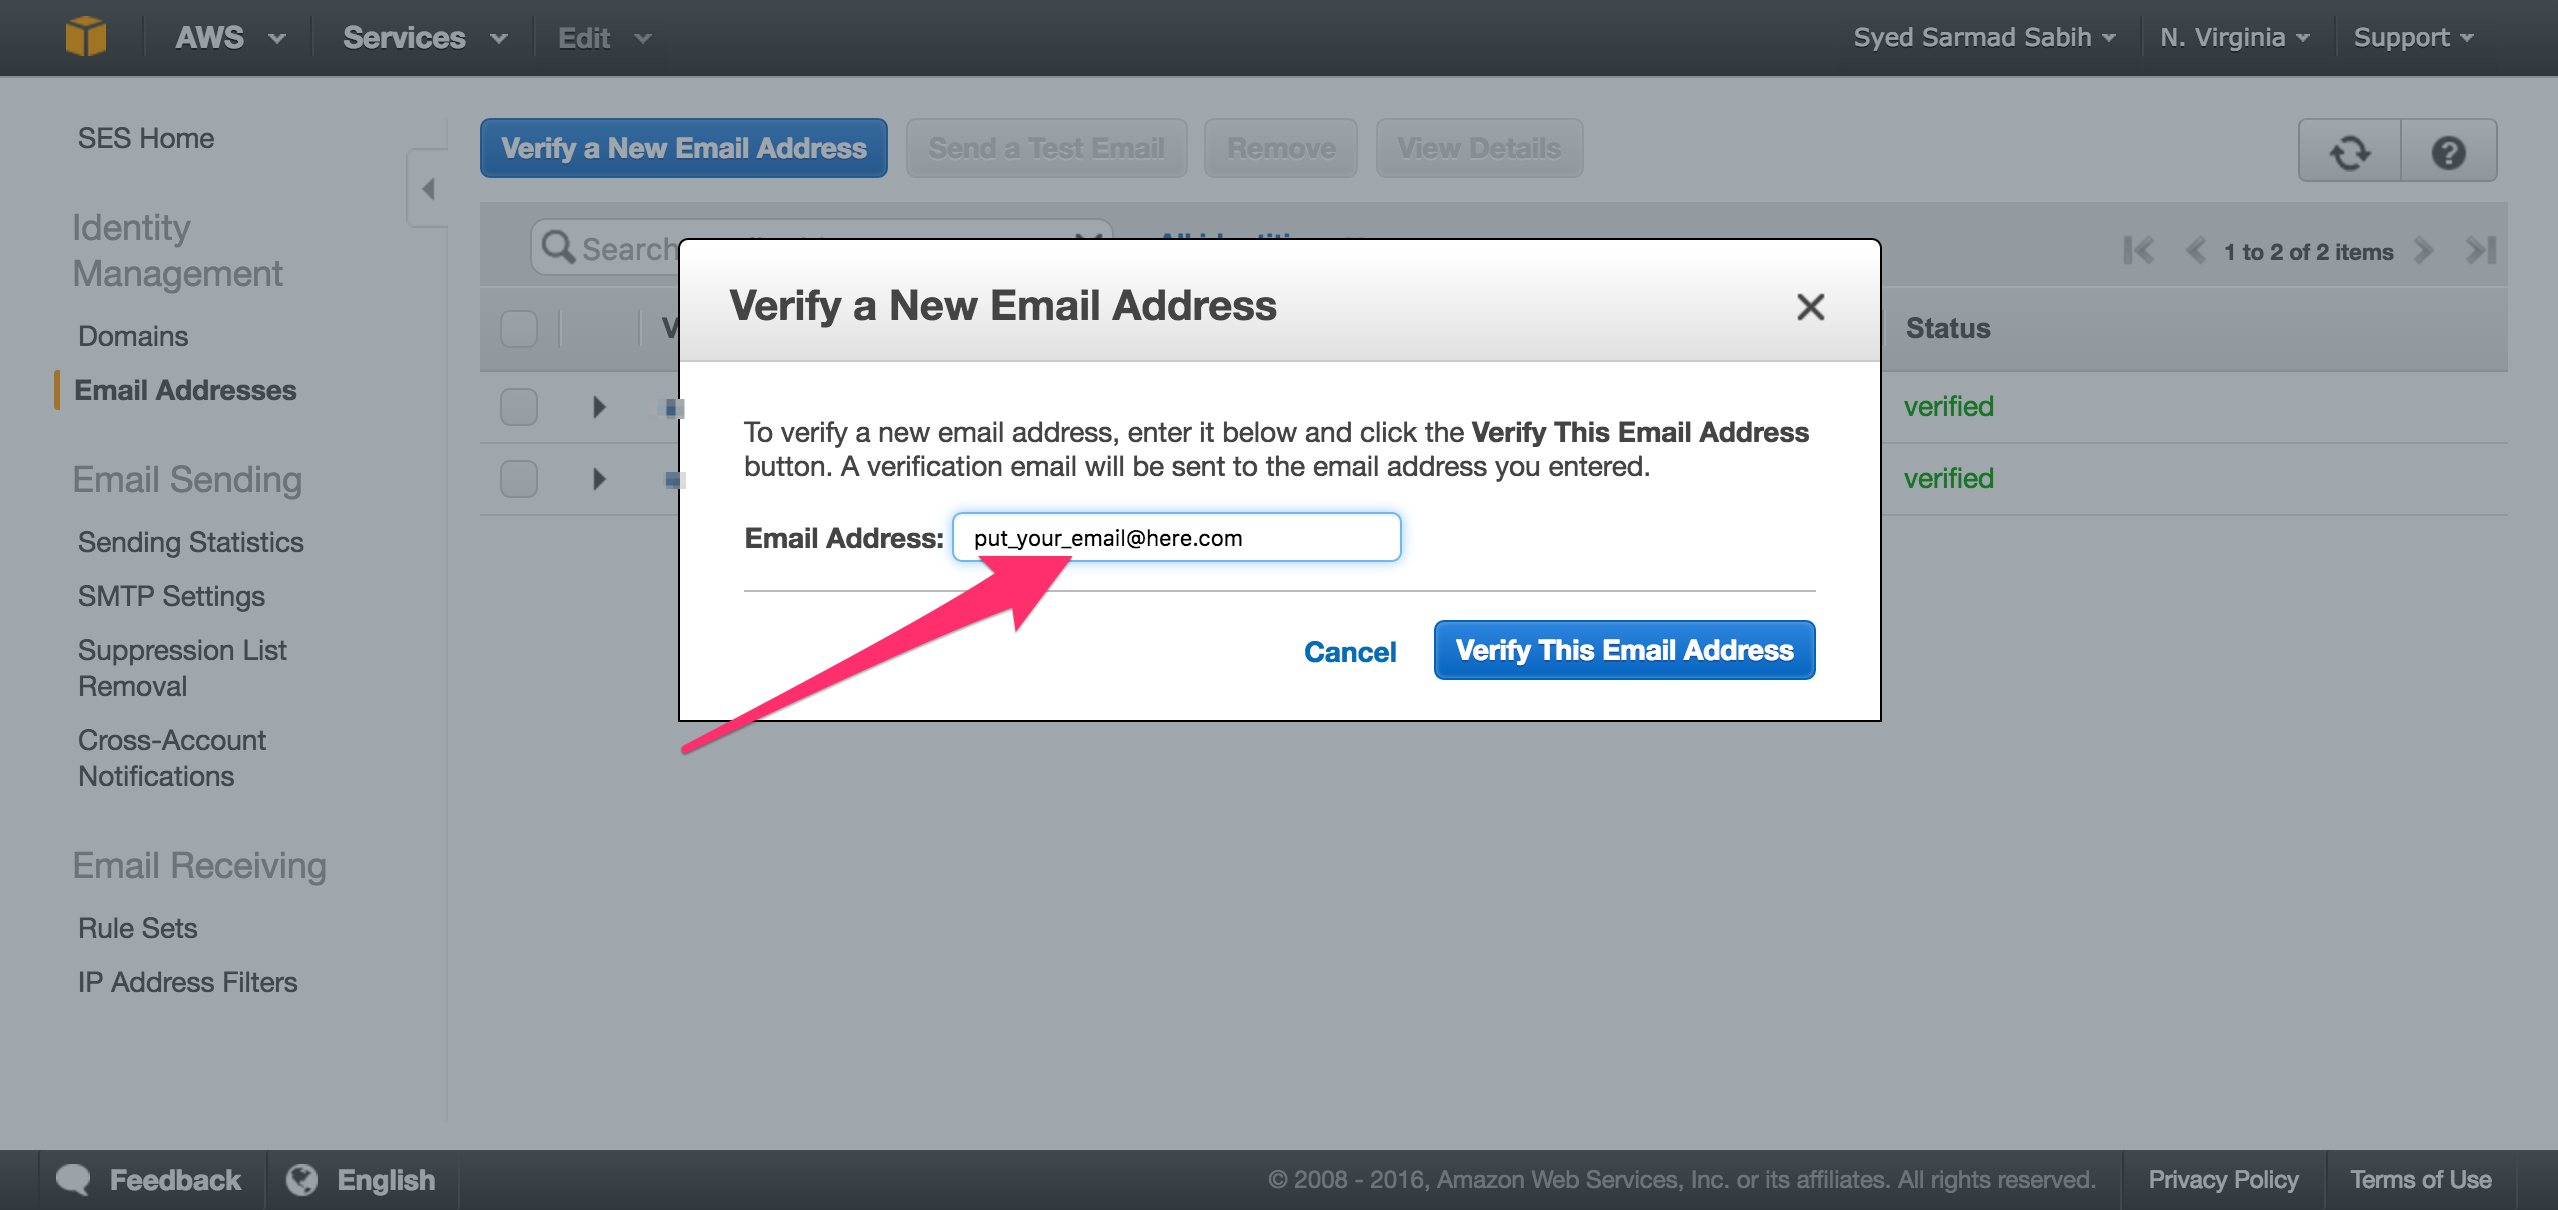
Verify two email addresses (You must have two email addresses to complete the email sending flow in Sandbox mode). I have already added two emails and verified them. Click on Verify a New Email Address button to add your sending and receiving email addresses.
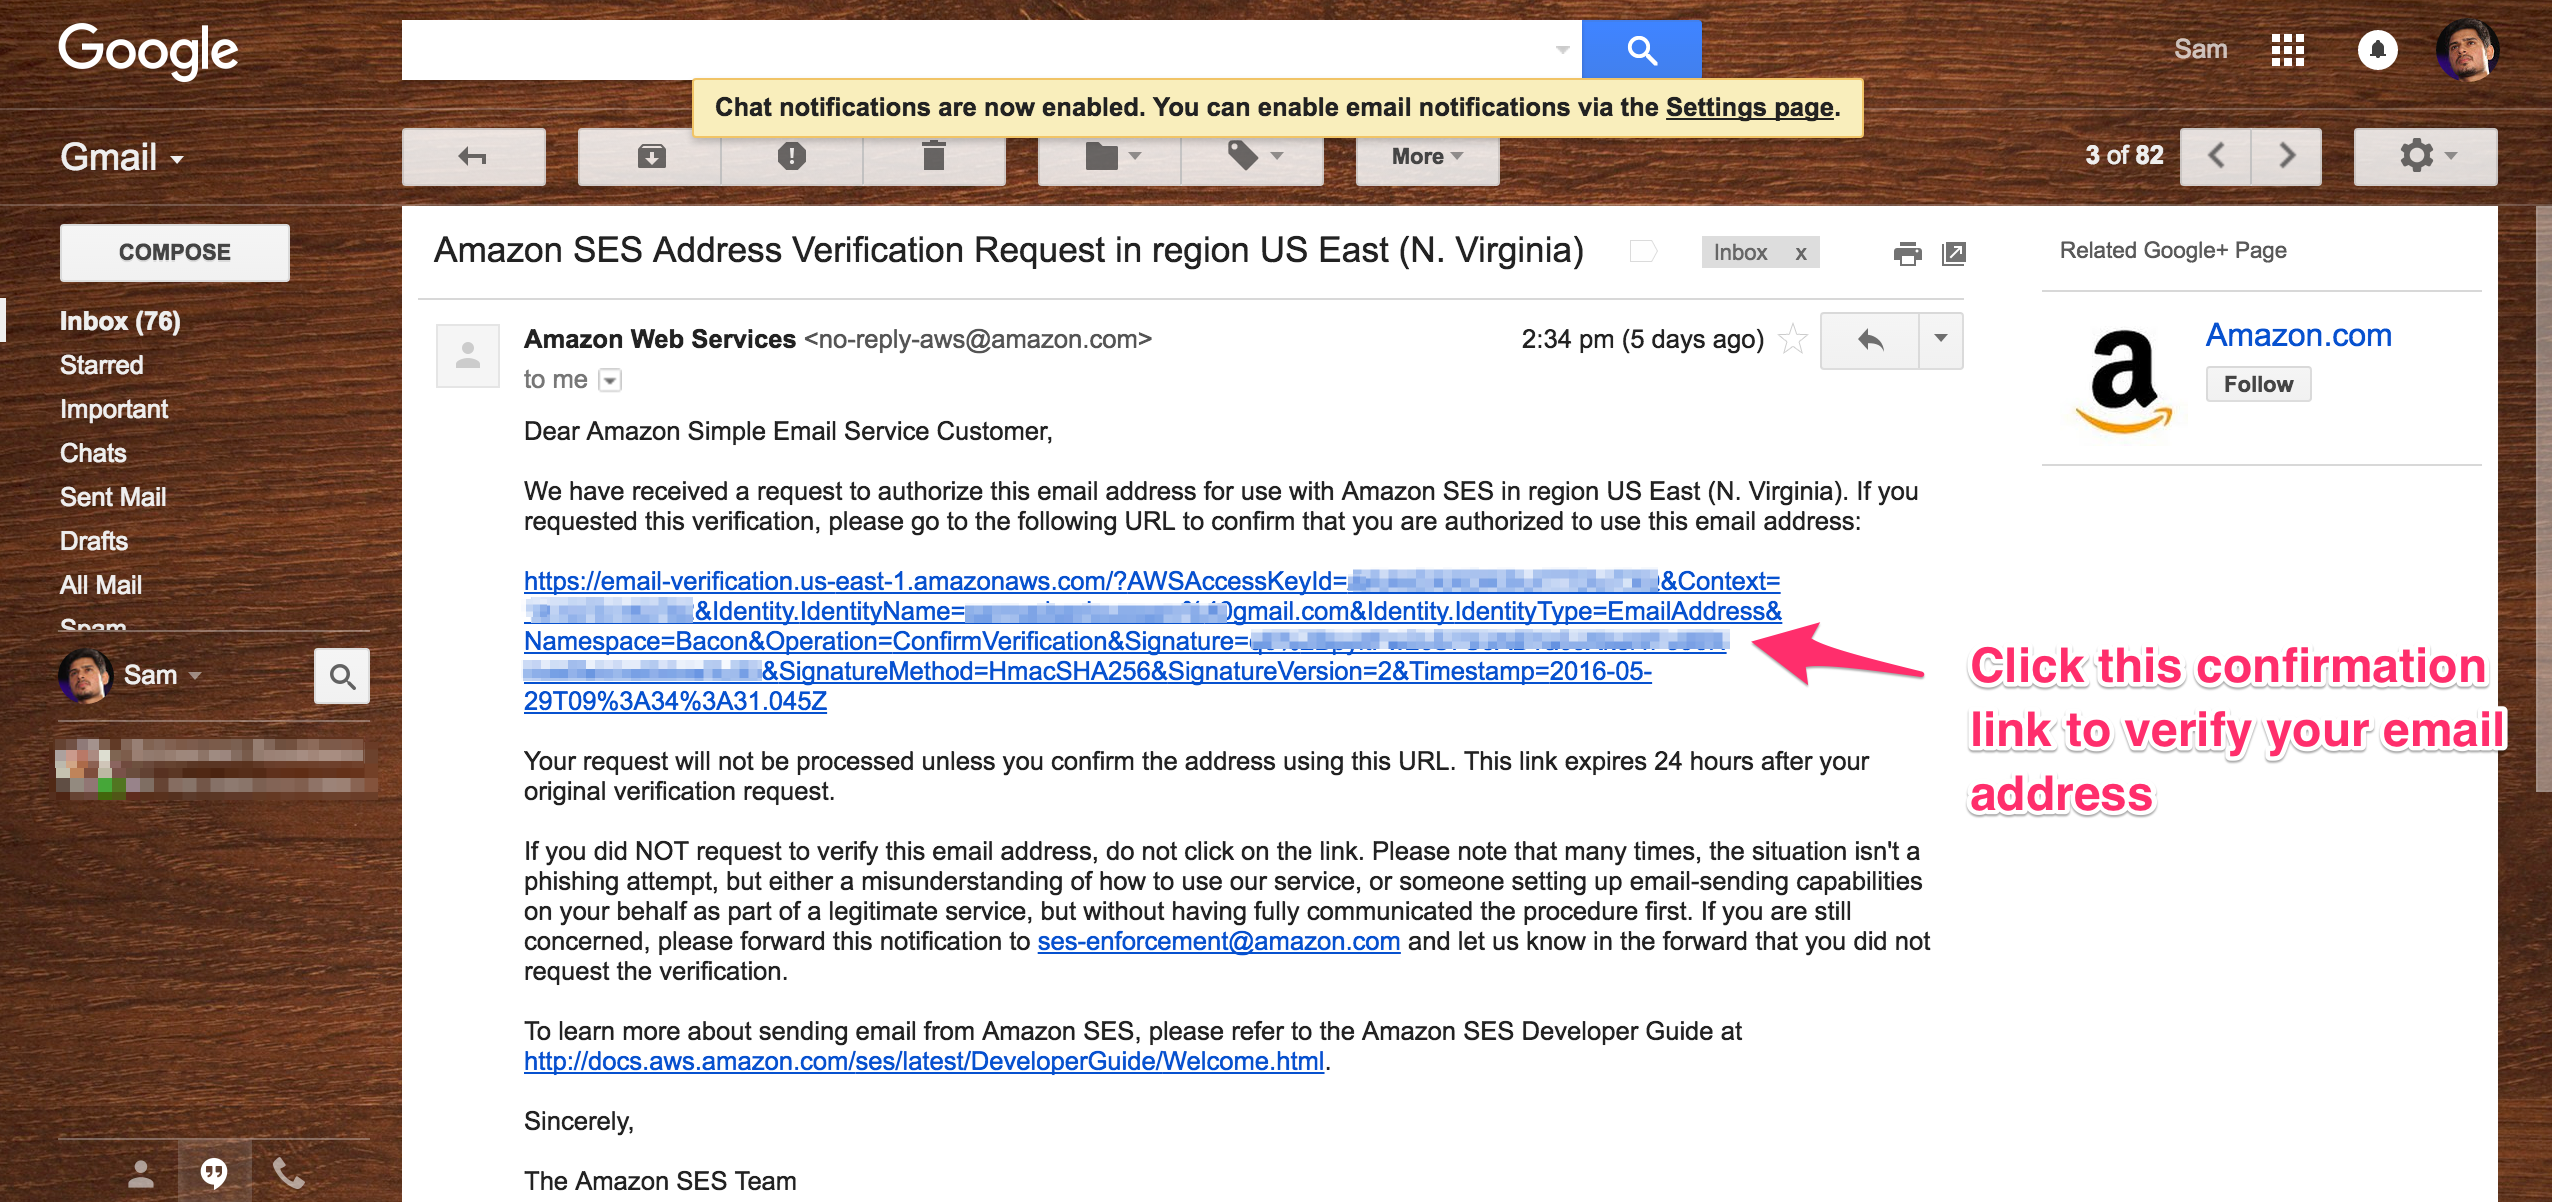
SES will send you a confirmation email, like the one below.
Create your SMTP credentials to use in your app. Copy the SMTP server name to use in your app.
Refreshing the SES Email Adresses page, you should see your email address as verified. Add another one repeating the same steps. Put one email address in app/mailers/application_mailer. rb, replace Some_email@example. com with yours.
And put the other one in app/mailers/my_mailer. rb, replace another_email@example. com with your other verified email address.
Go to the SES SMTP Settings page
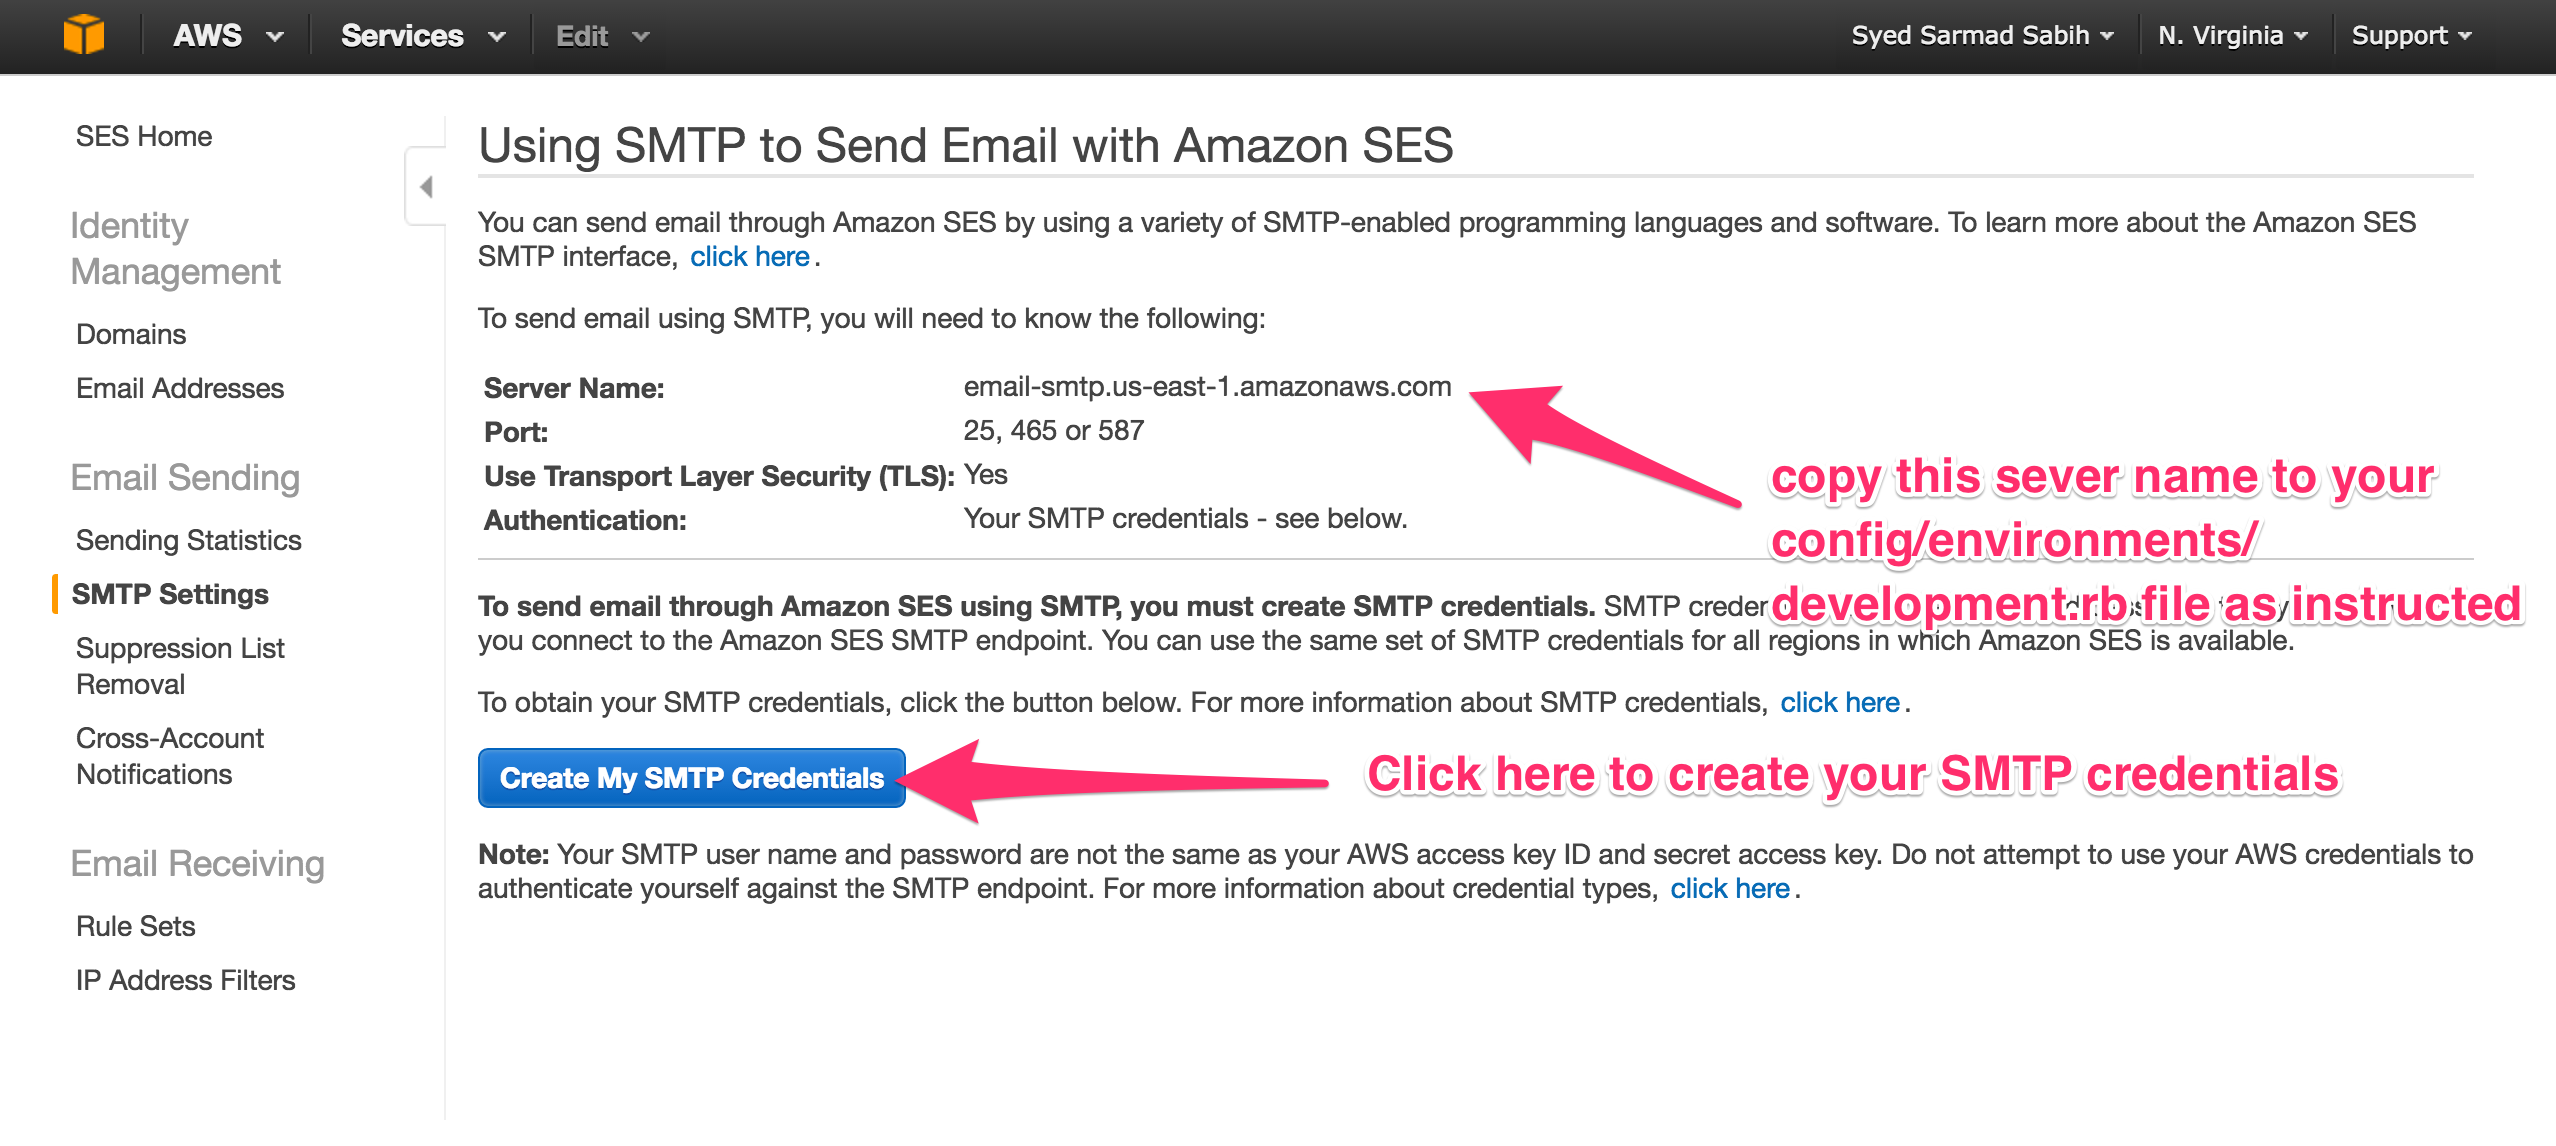
Copy the Server Name from there and put it in the action_mailer. smtp_settings block in config/environments/development. rb. Replace this line
With the Server Name you copied from the SMTP Settings page.
Now the action_mailer. smtp_settings block should look similar to this
Click on the “Create My SMTP Credentials” button shown in the picture above.
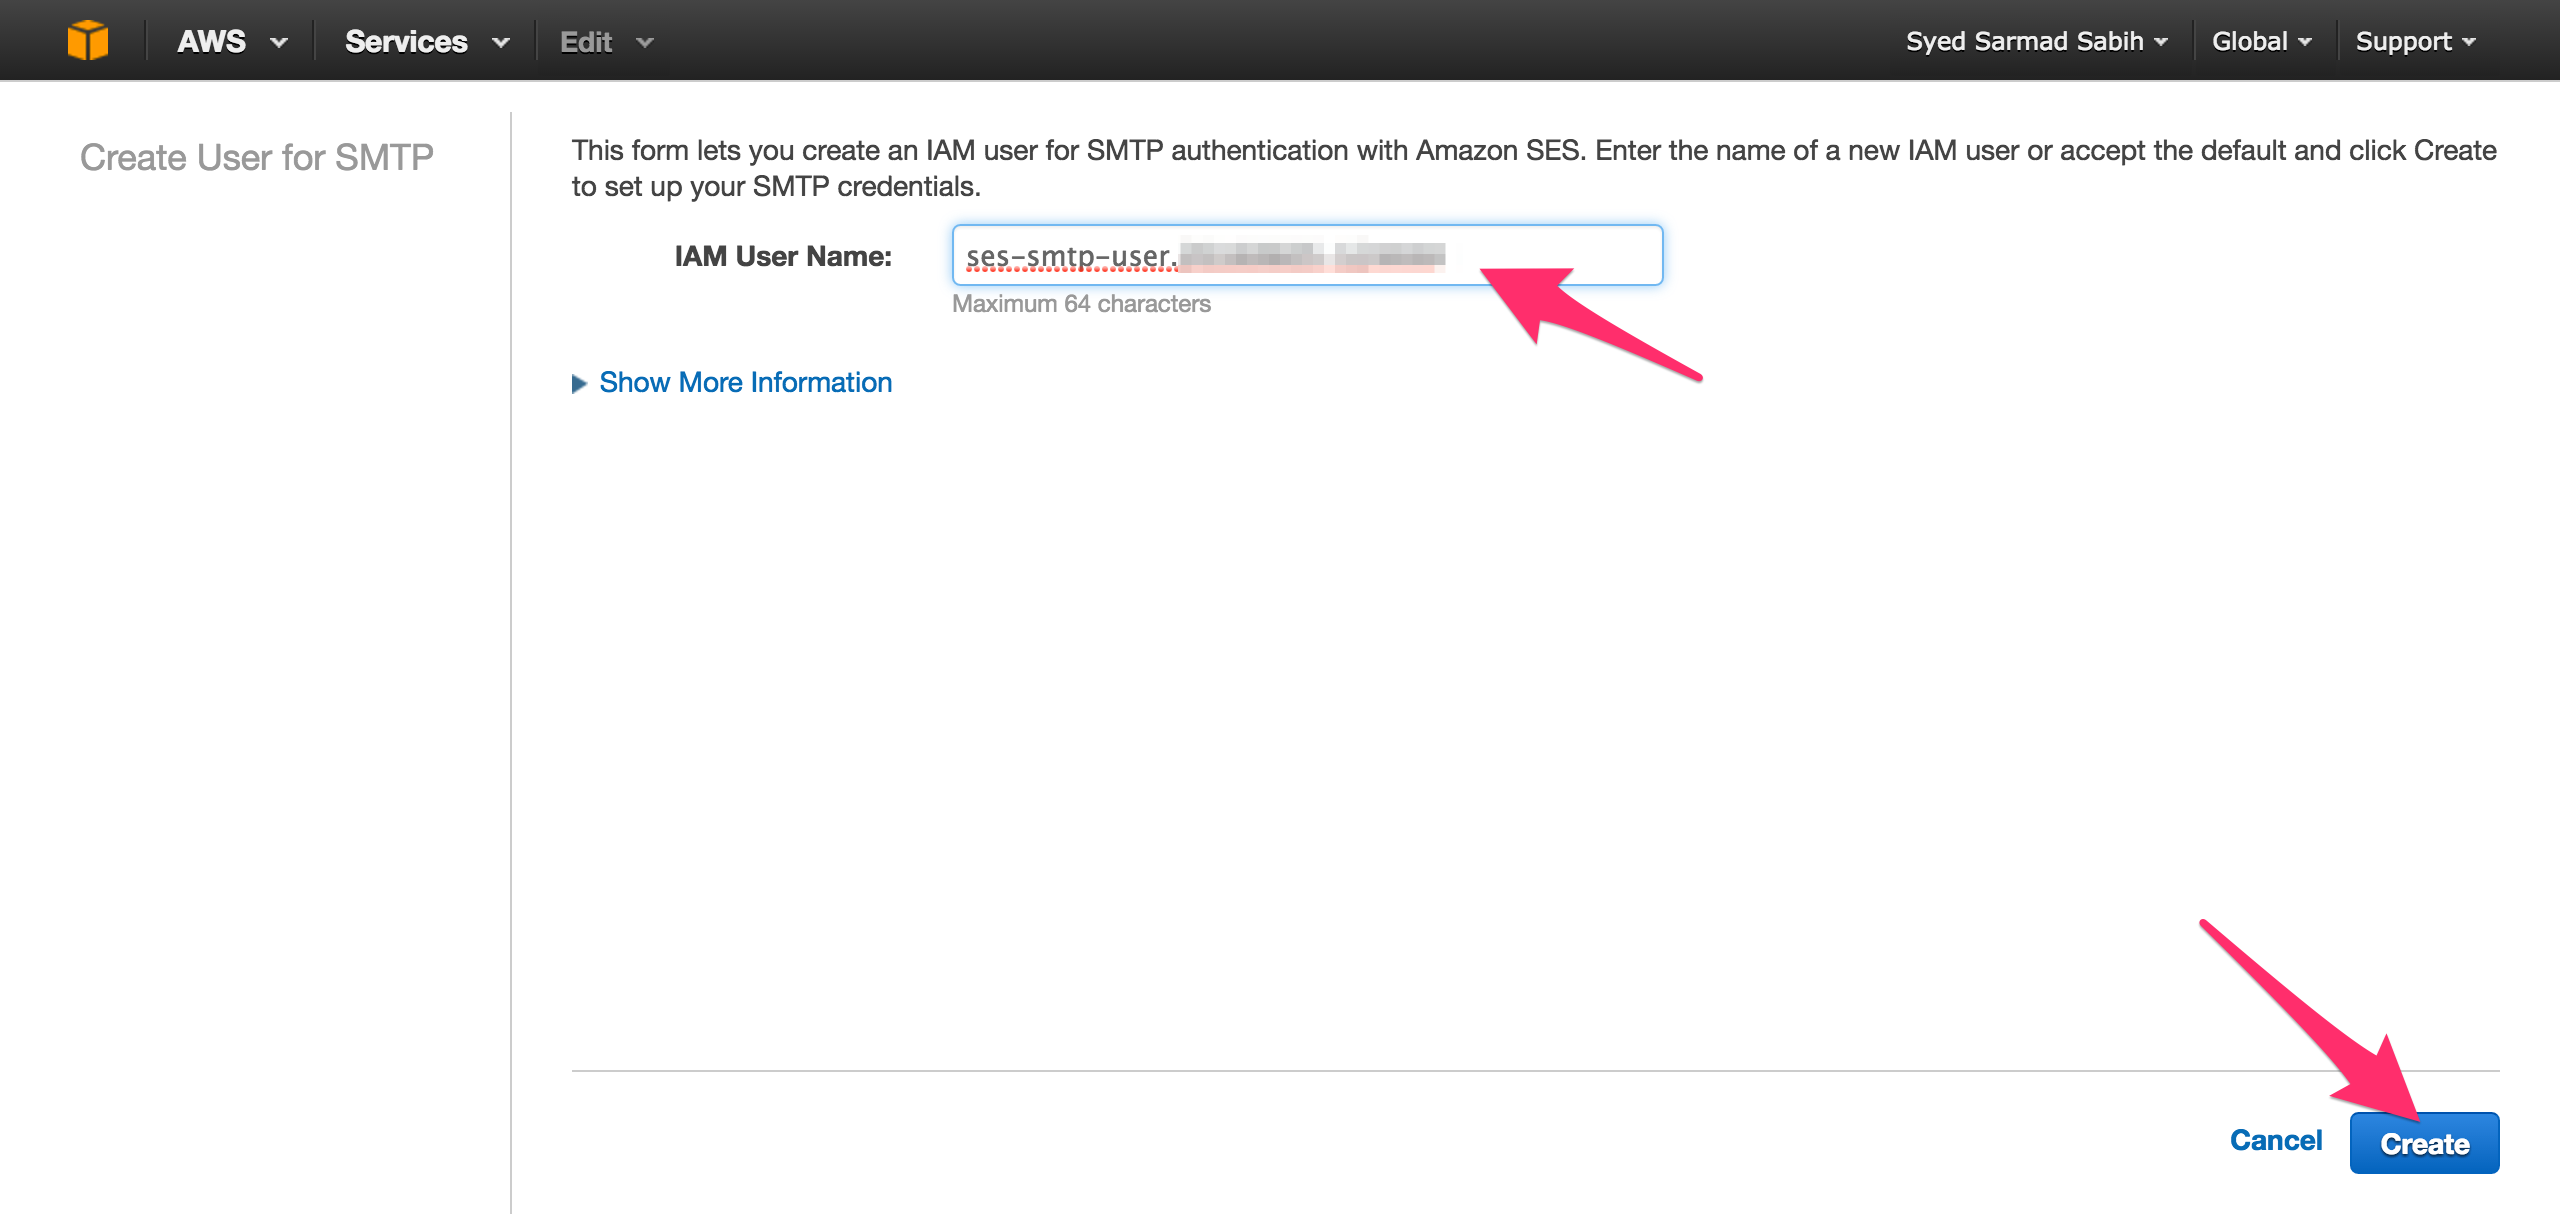
You can change this username if you want, but this default one will do the trick for now.
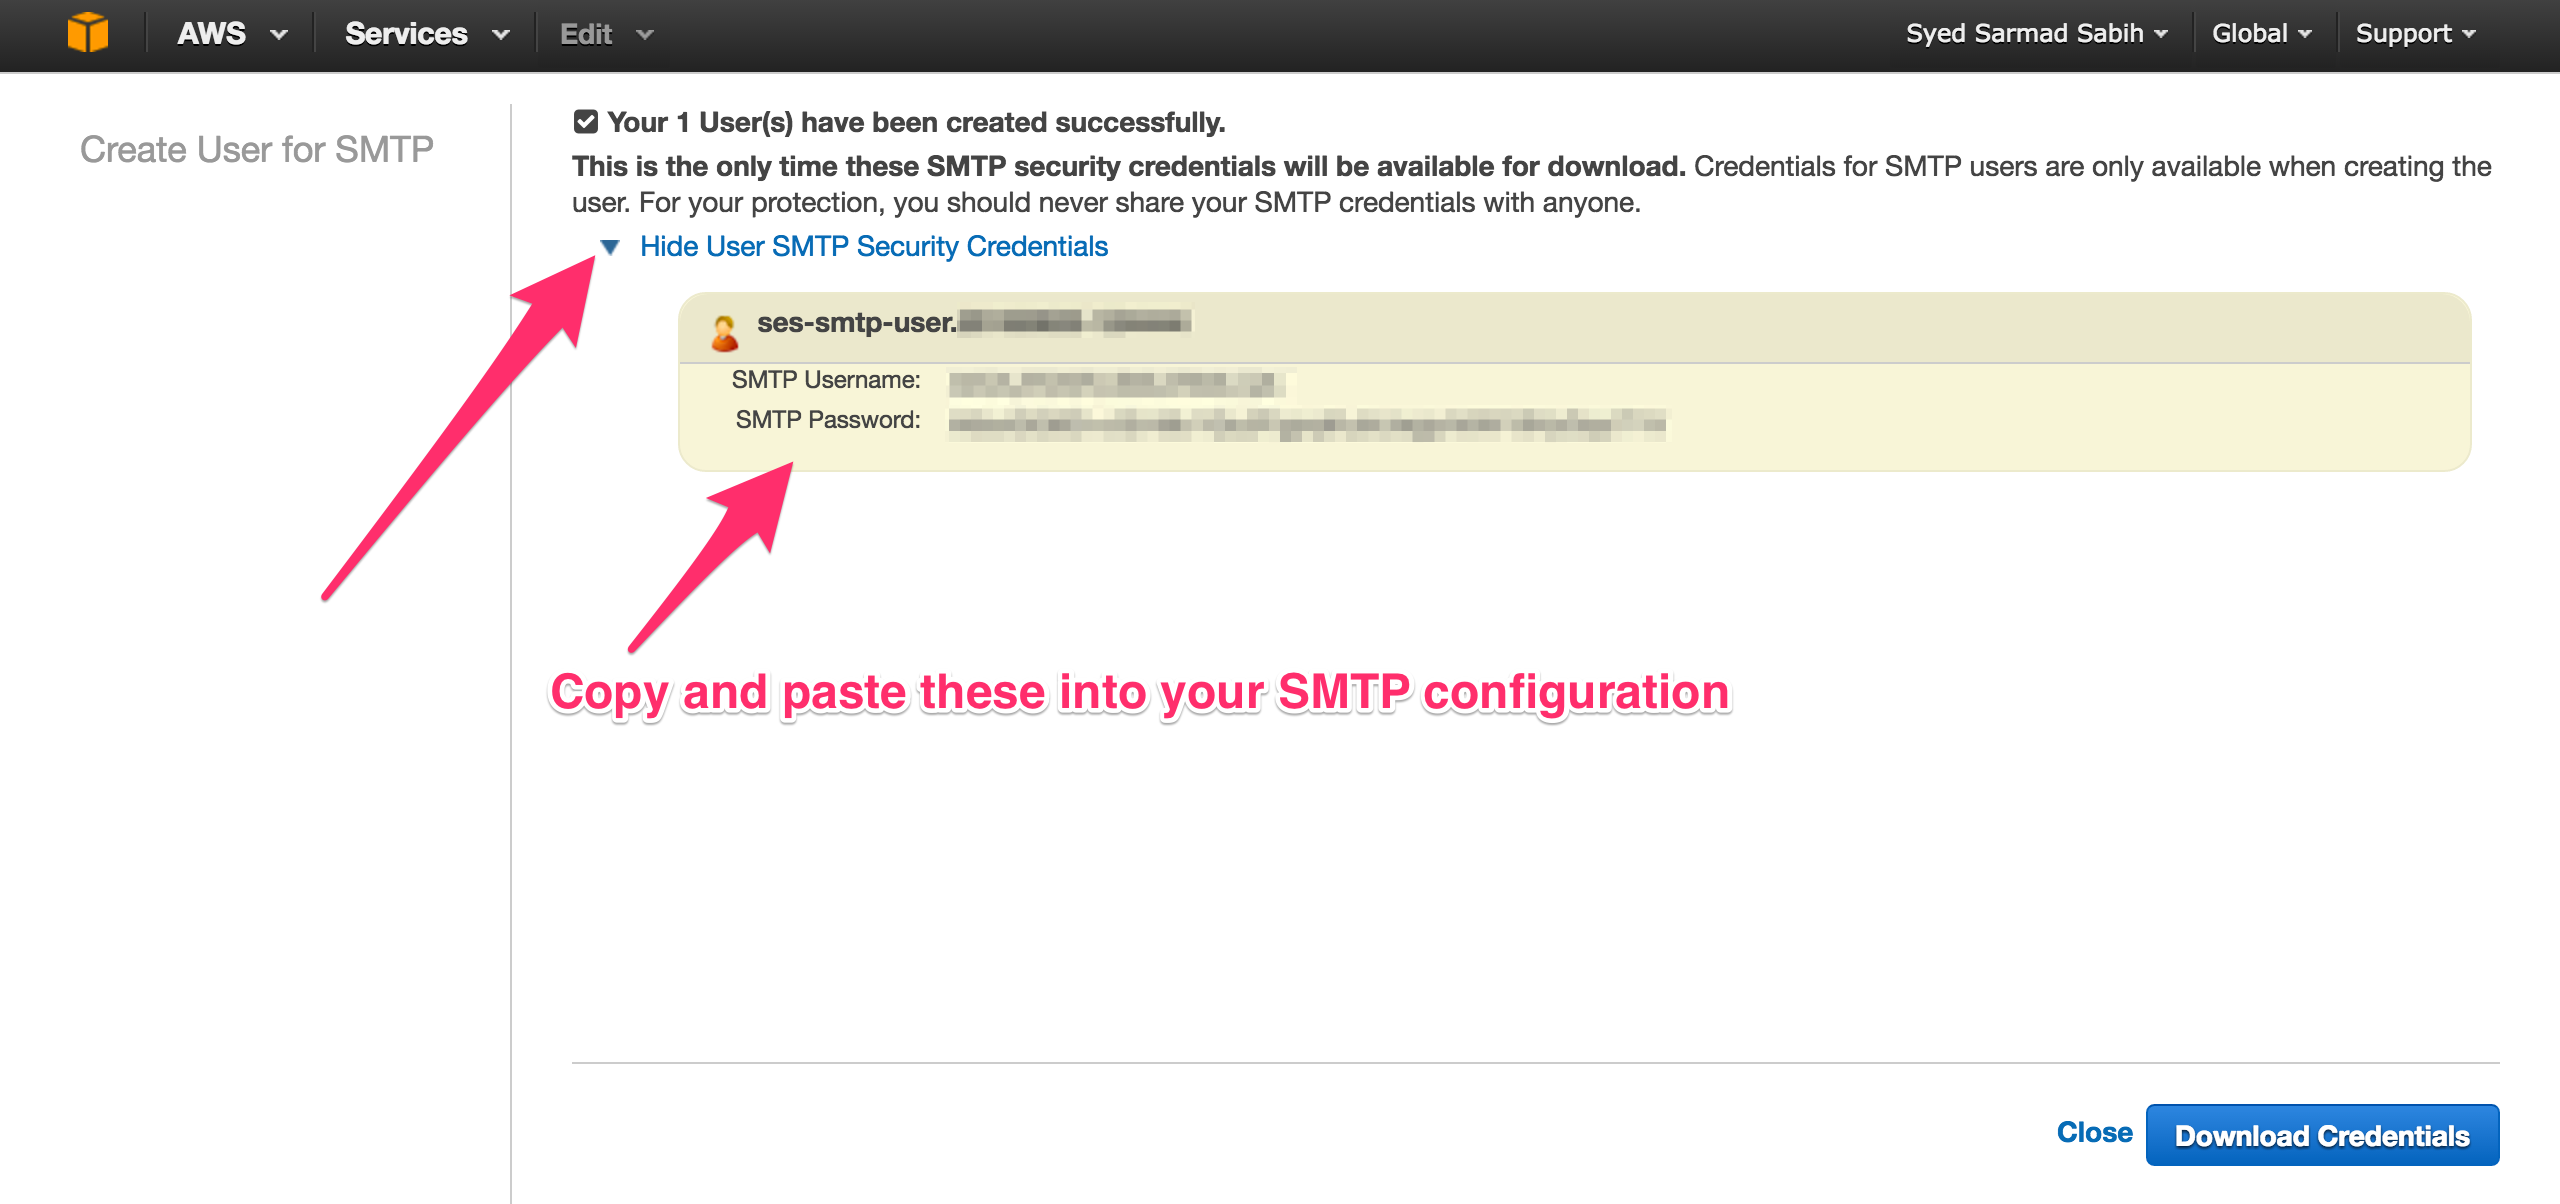
Copy these credentials and paste into your config/environments/development. rb or, better yet, export them in your environment:
We are all set to send emails now.

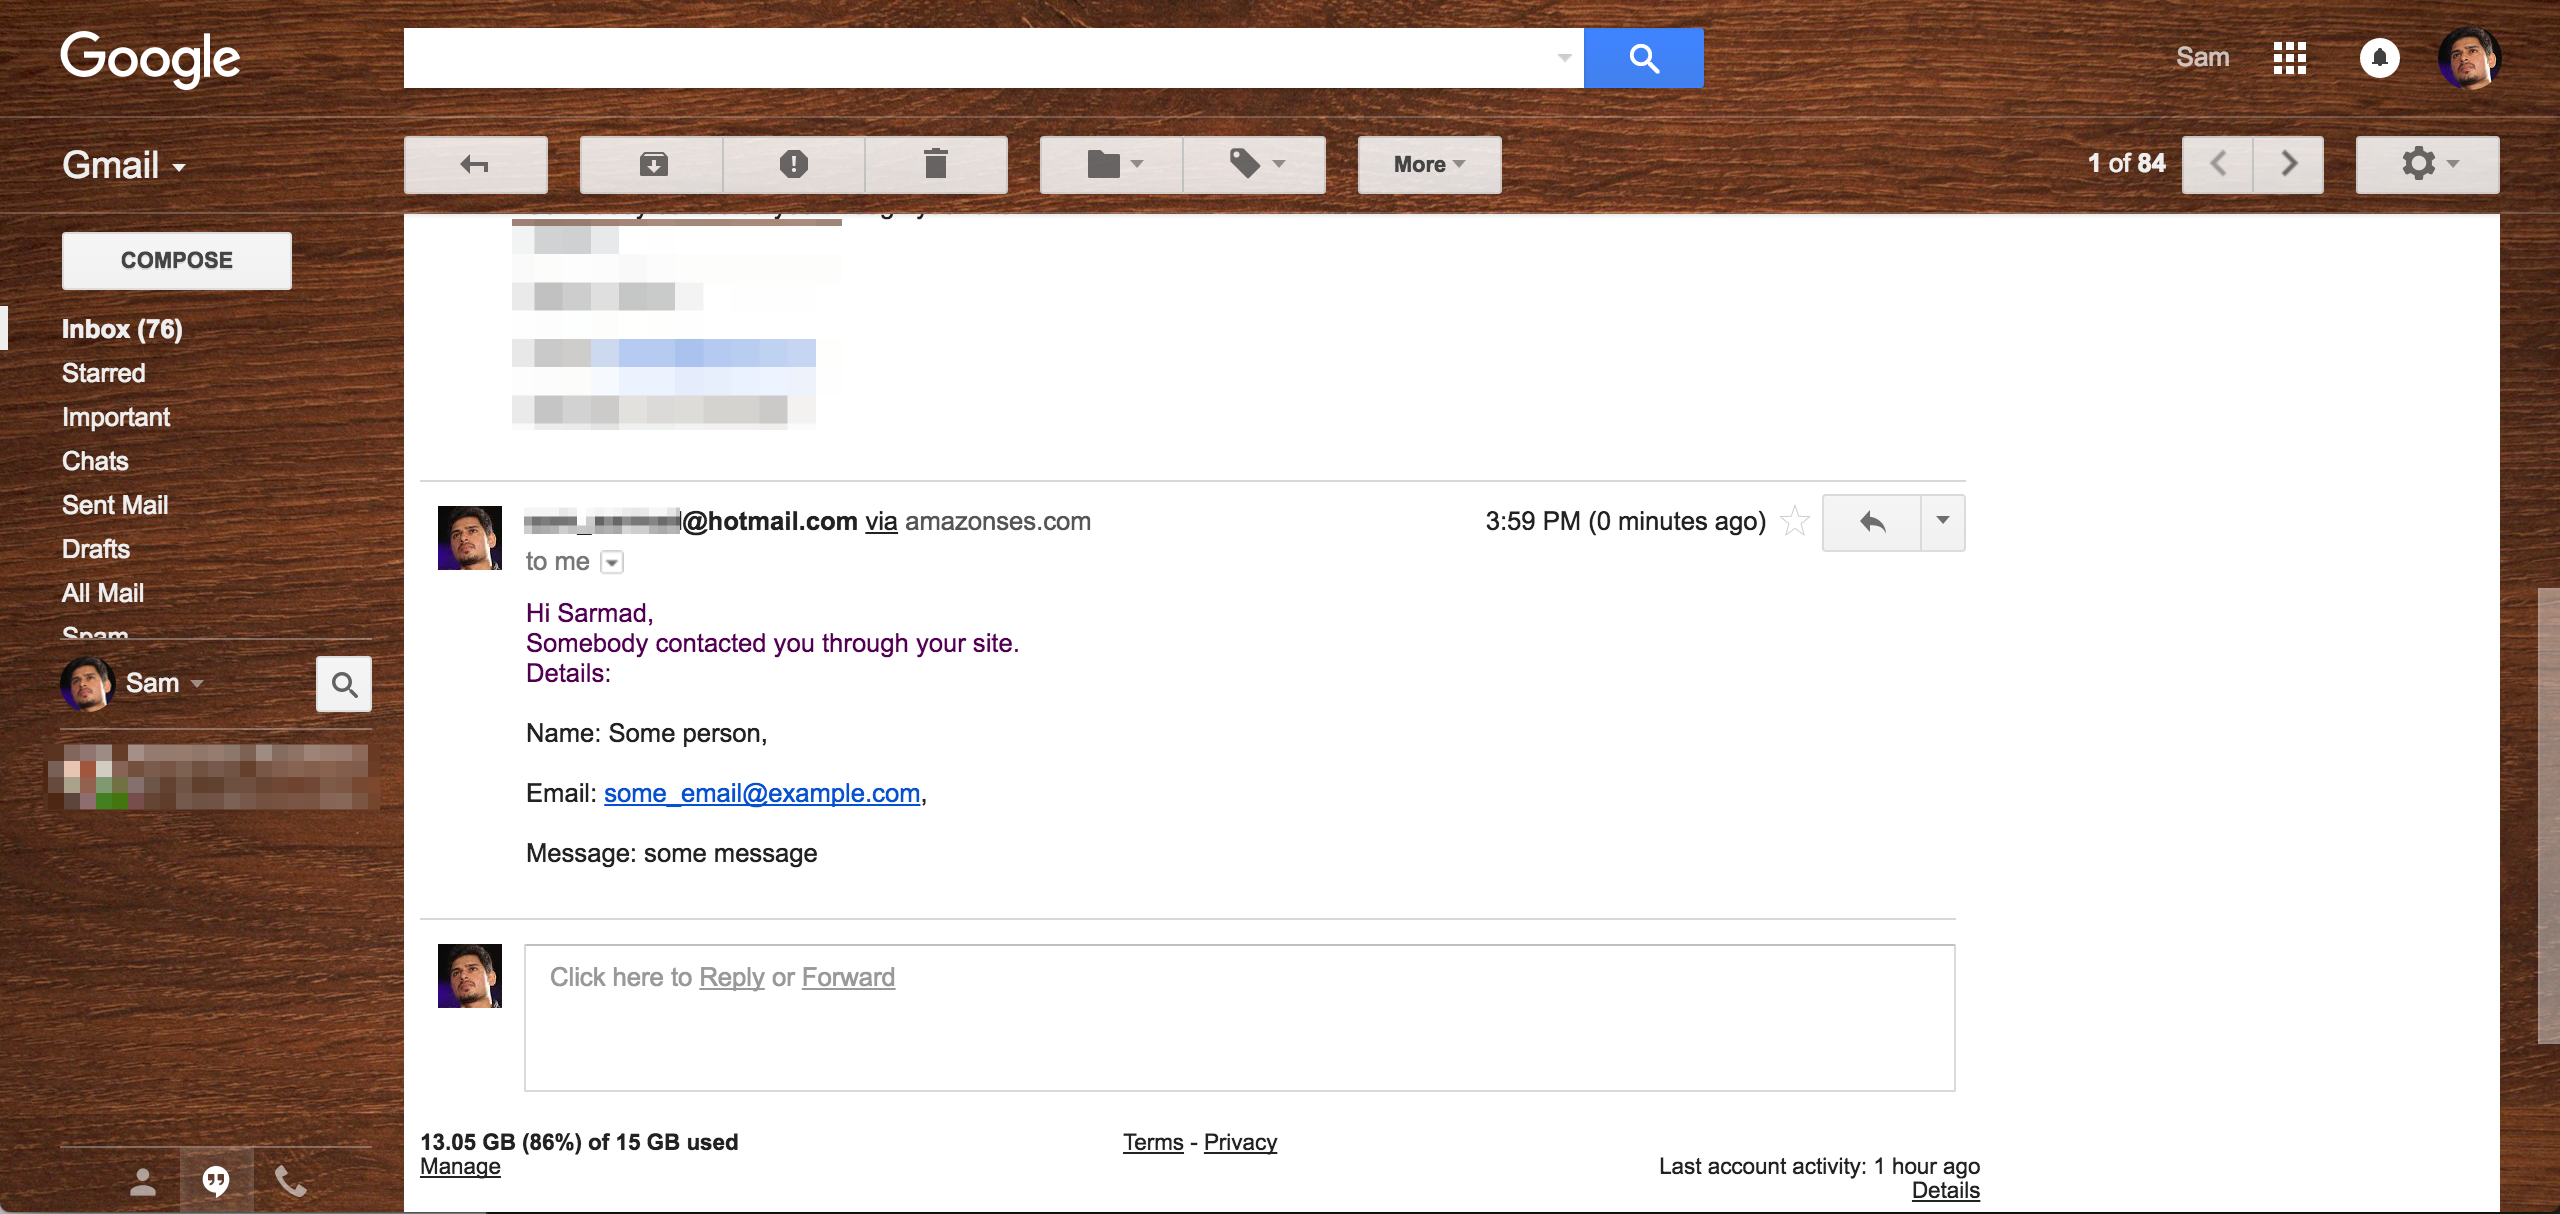
Click Submit. You will see an email sent notice.

Let’s head over to the inbox to verify if the email was properly sent and received.
This sums up this post about setting up our Rails app to send emails with Amazon SES. With this setup and configuration, you can send 62,000 free emails if the app is deployed on Amazon EC2. However, there are some things you must keep a close eye on
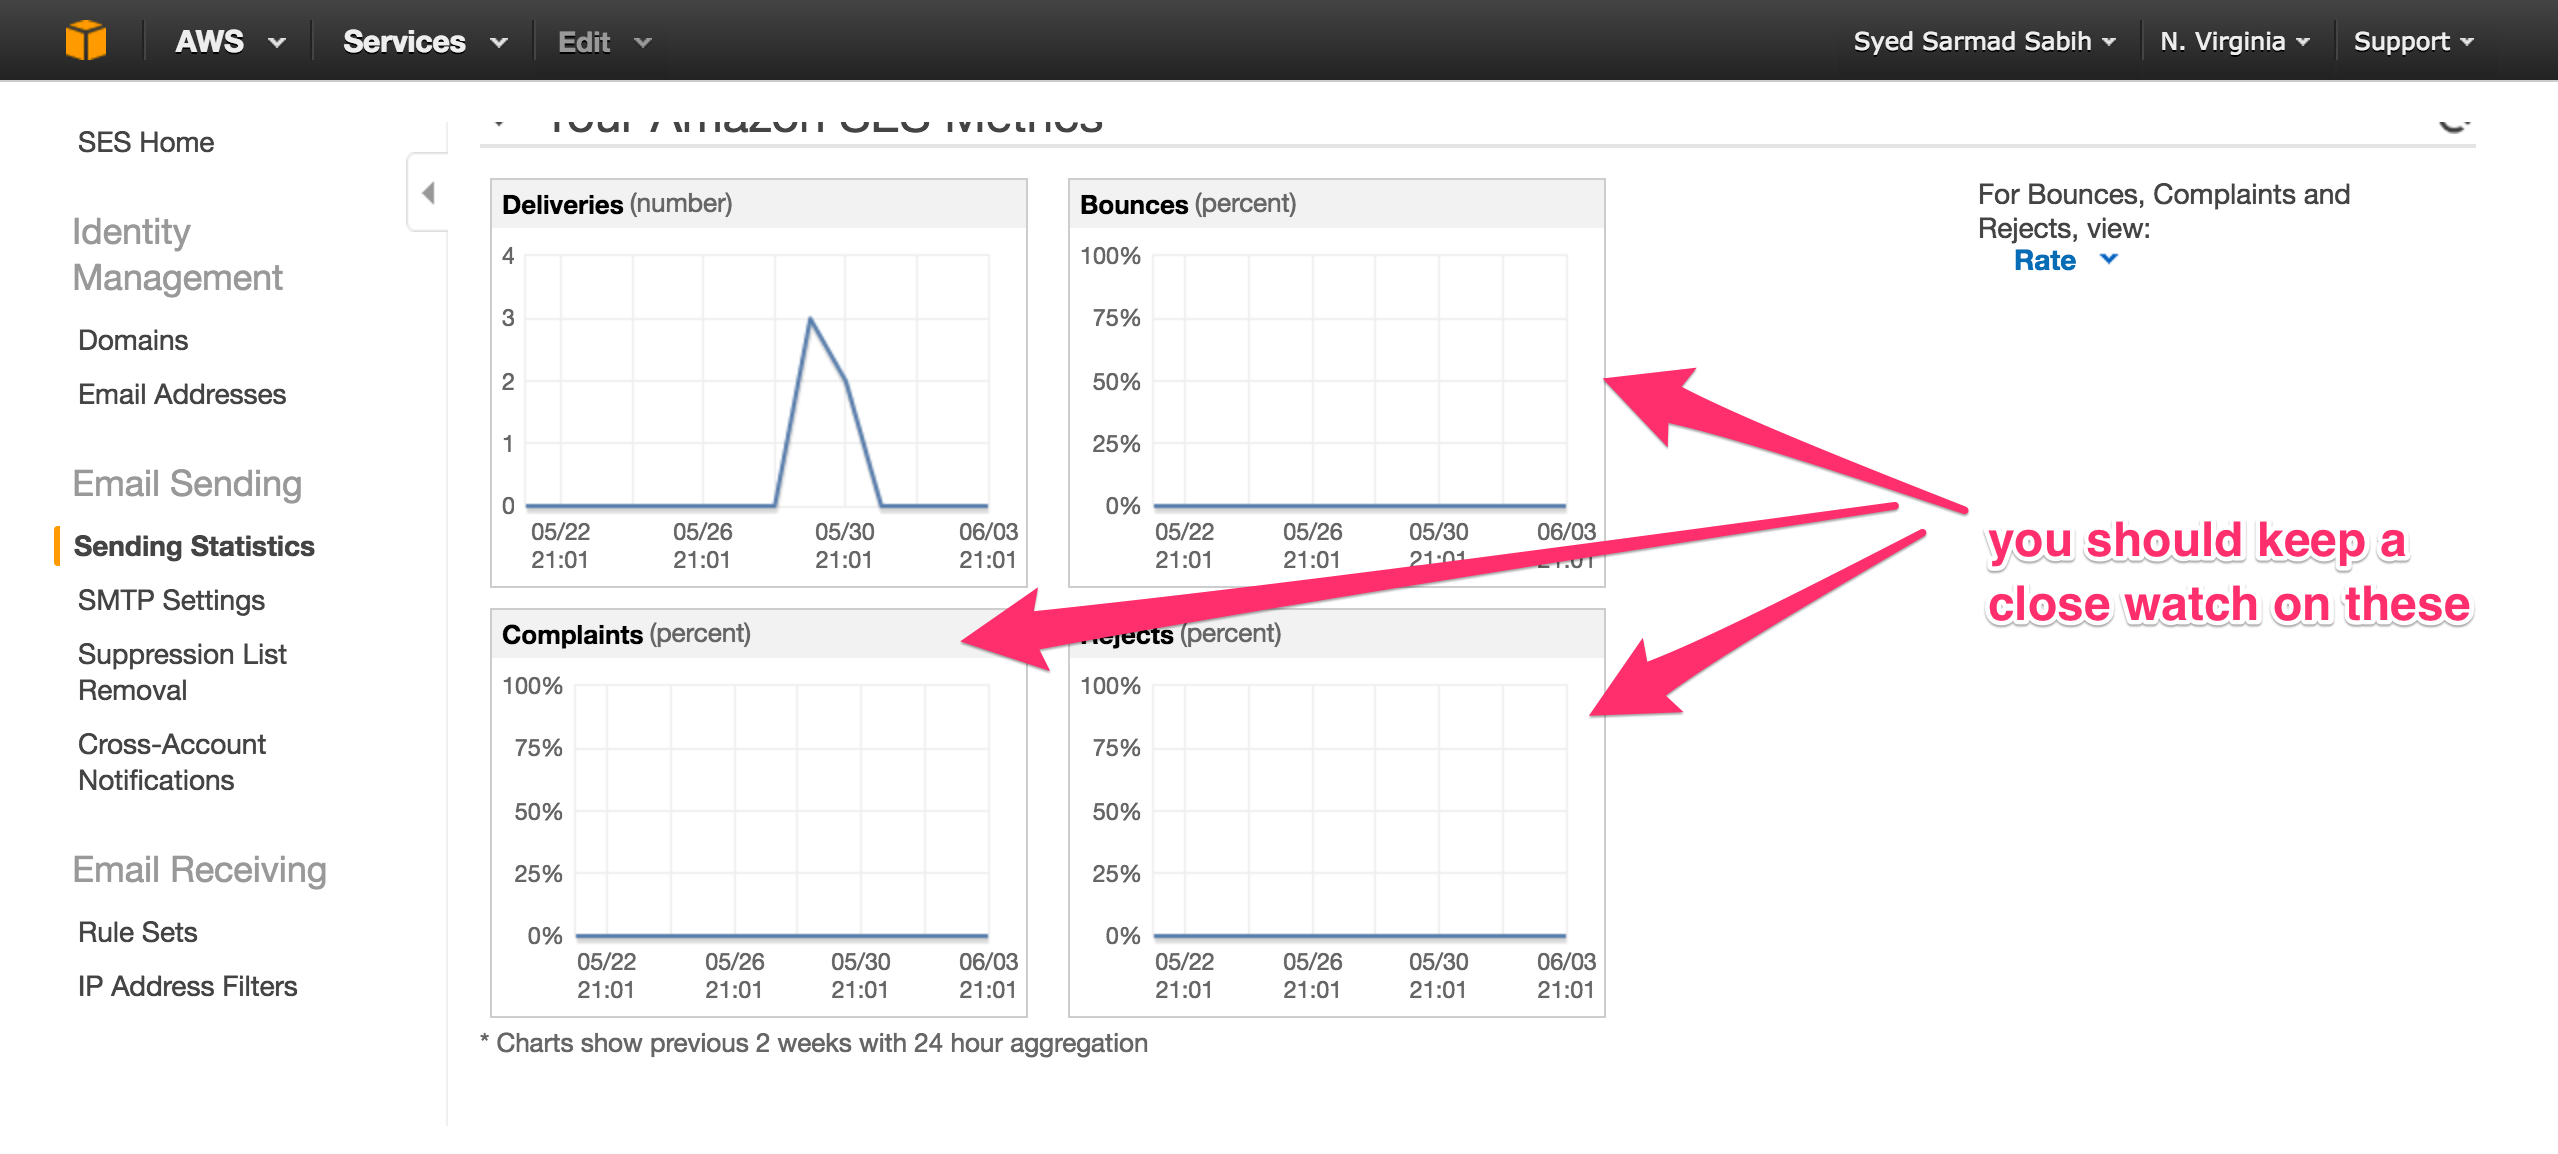
Your Amazon SES account can be blacklisted and blocked if you have a lot of Bounces, Complaints or Rejects. You can read more about it here.
As we discussed that we’re going to be sending emails from Amazon SES Sandbox for this post. You can request Amazon to move you out of the Sandbox from here

You can read more about that here.
Conclusion
Amazon SES is a great option out there to send easy and inexpensive emails. There are other services as well which might be a better fit than Amazon SES, in some cases, which I’ll hopefully cover in the future.
Important Update: Amazon Local has Stopped Selling Daily Deals
Effective December 18, 2015, Amazon Local stopped selling daily deals at local. amazon. com and on the Amazon Local app. Deals you have already purchased are not affected by this change.
What this means:
- The promotional and paid value of any new or unused vouchers remain valid as specified on the vouchers. You will still be able to redeem valid vouchers even after December 18, 2015.
You can continue to access your used and unused vouchers by visiting local. amazon. com/purchases.
Please see below the answers to Frequently Asked Questions:
What happened? Is there a different Amazon deals service?
- Effective December 18, 2015, we have stopped selling Amazon Local daily deals. Merchants will no longer be able to sell deals and customers will no longer be able to buy deals at www. local. amazon. com and on the Amazon Local app. We are only going to stop selling daily deals for local merchants at local. amazon. com and on the Amazon Local app. Amazon’s Deal of the Day, Gold Box Deals, and Kindle Daily Deals are not affected by this announcement.
Can I still use my voucher?
- Deals you have already purchased will not be affected by this change. The promotional and paid value of any new or unused vouchers remain valid as specified on the vouchers. You will still be able to redeem valid vouchers even after December 18, 2015.
Can I just get a refund?
- We encourage you to use your voucher as intended whenever possible, but please let us know if you encounter any issues. To review our complete refund policy, please see the Refund Policy section of this page.
What if the merchant won't honor my voucher?
- If you encounter any issues redeeming your voucher, please contact us about your experience so we can take the appropriate action.
Will my Amazon Local account page go away? Can I still access my vouchers?
- You can access your used and unused vouchers by visiting local. amazon. com/purchases.
Is Amazon getting out of local commerce?
- Amazon still helps connect customers to local businesses through a variety of offerings - including Amazon Home Services and Prime Now Restaurants.
What if I have a problem with my voucher after December 18, 2015? Who will help me?
- If you have any questions or need any assistance, you may continue to email us or request a call back in the Contact us section.
What will happen to my account credit?
- As of December 18, 2015, we have stopped selling Amazon Local Daily Deals, and unused promotional credits are no longer valid.
Where is my daily email?
- As of October 30, 2015, we have stopped sending you daily deal emails.
Deals & Vouchers
About Vouchers
When you bought a deal on the website, we sent you a voucher redeemable for the goods or services listed. You can check the What You Need to Know section of individual deals for redemption instructions, merchant and ticket provider contact information, purchase limits, expiration dates, and more.
Most vouchers require that you use the entire value in a single visit, but some businesses allow partial uses of vouchers. There are often different expiration terms for the paid and promotional values of a deal. The paid value, or dollar amount you paid, usually expires after the promotional value. The promotional value is the amount listed next to Savings on the deal. If the promotional value has expired but the paid value hasn't, the merchant must still honor use of the paid value. You may need to pay the difference between the paid value and the full price, though.
In all states, the paid value will remain valid for up to five years. Due to state requirements that prohibit expiration periods, the paid value won't expire in California, Connecticut, Florida, Maine, Massachusetts, Minnesota, Montana, New Hampshire, New Jersey, North Dakota, Oregon, Rhode Island, and Washington.
Note: If you've redeemed a coupon on Amazon Local instead of a voucher, the entire offer will expire at the time listed when you redeemed the coupon.
If you have any questions about your voucher, please contact the merchant. If you have any questions about seating or the pick-up name on your ticket for an event deal, you can contact the ticket provider.
Refund Policy
About Our Refund Policy
Most unused vouchers are eligible for a refund within 30 days of purchase. If a business closes permanently, we will always refund any unused vouchers. Your refund request will be processed to the original payment method instantly. However, it may take 2-3 business days for it to display on your credit card statement.
Refunds are subject to the business's policy, which can be found in the "What You Need to Know" section of every travel offer. If you have met the conditions and would like a refund, fill out either the phone or email contact information in the "Contact us" section on this page.
Gifts & Gifting
Redeem a Gift Voucher
If you received an Amazon Local voucher as a gift, you can add it to Your Account by signing in or setting up an account.
To add your voucher to Your Account:
Click Get your gift now in the Amazon Local e-mail you received. Follow the on-screen instructions. View your gift in Your Orders.
Once you've added your voucher to Your Account, you can check the redemption instructions, scheduling requirements, available locations, and expiration dates.
Note: We won't disclose if or when you've used a gift with the gift giver; they'll only know if the gift has been claimed. If you want to return a gift for a refund, you'll need to contact the gift giver.
Manage Amazon Local on Mobile
You can use the Amazon Local app to redeem your vouchers.
- Redeem Your Vouchers: Go to Your Vouchers and click on your deal to open your voucher code. Show the voucher code to the business so they can scan it.
Note:
- Some businesses require a printed copy of your voucher. If this is the case, it will be stated on your voucher so you will know in advance. If you're unable to redeem your voucher and can't resolve the issue with a manager at the business, please Contact Us.
Passcode Lock: Set up a 4-digit code to add an extra layer of protection by doing the following:
Go to Settings. Click on Passcode Lock. Click Turn on Passcode Lock. Enter a 4-digit passcode. Re-enter your passcode to confirm.


Комментариев нет